If your pantry feels cluttered, the fix usually isn’t “more bins”—it’s a system. The right pantry storage containers make shelves look cleaner, help you see inventory, and reduce the constant half-open bags problem.
This guide breaks down the three most common styles—airtight, stackable, and modular—so you can choose what actually fits your space and routine.
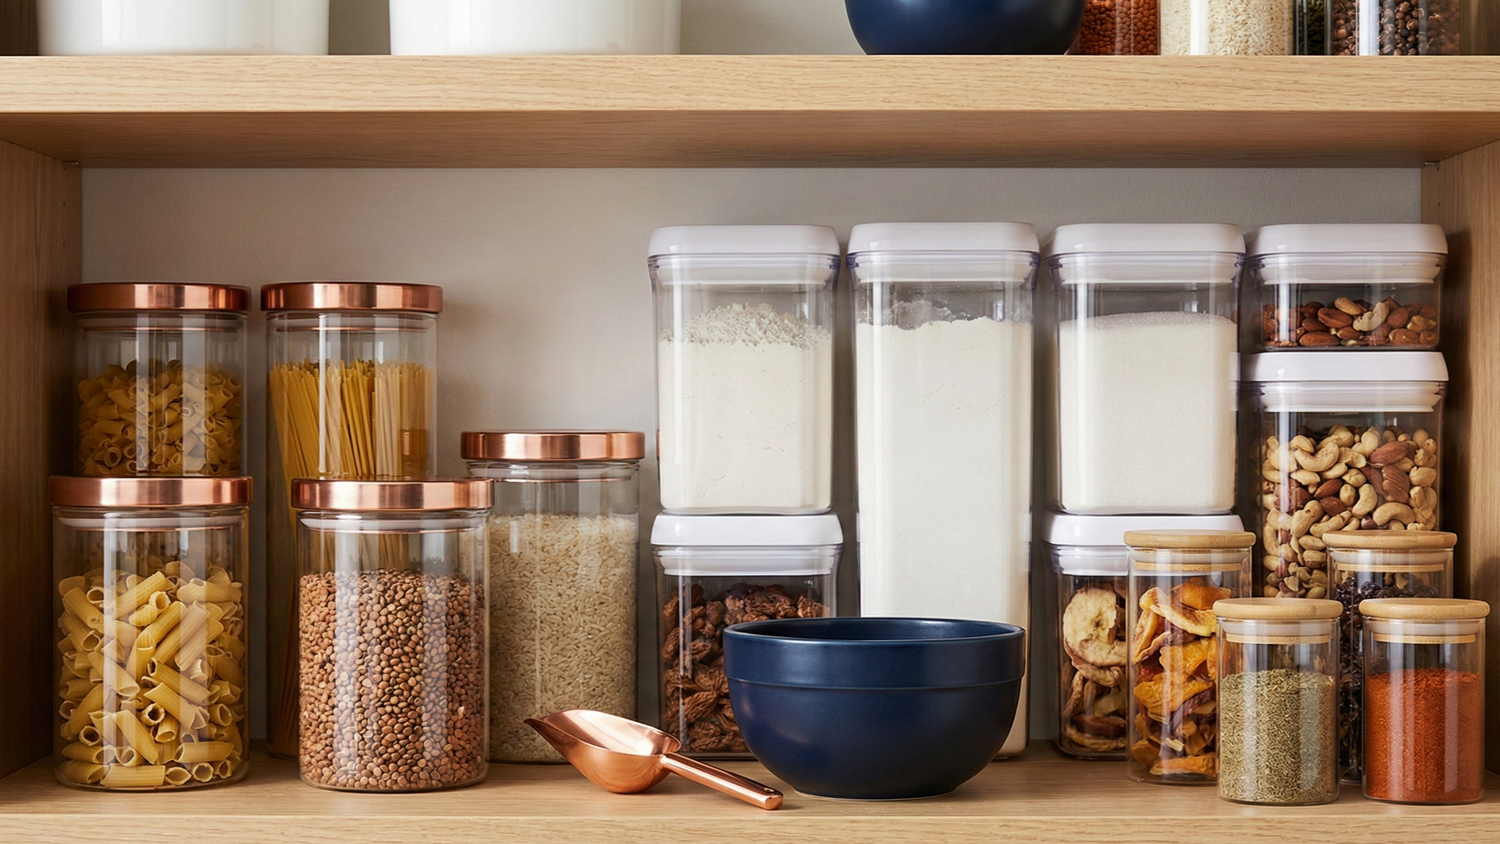
Start here: what are you storing?
Different foods behave differently in storage. Before choosing containers, group your pantry into a few categories:
- Baking: flour, sugar, oats, cocoa
- Breakfast: cereal, granola
- Cooking staples: rice, pasta, lentils, beans
- Snacks: nuts, crackers, dried fruit (if you store it)
- Small items: spices, tea bags, seasoning packets
Once you know what you’re storing, you can choose container types and sizes that match your shelves and how often you restock.
Airtight pantry containers: when they matter (and when they don’t)
Airtight containers are designed to limit airflow and moisture exchange. In pantry terms, that usually means dry goods stay crisper and less prone to clumping.
Best for
- Flour, sugar, oats and baking ingredients
- Cereal and crunchy snacks that go stale
- Rice/pasta when you want a cleaner pantry and consistent scooping
What to look for
- A lid that closes consistently (no guessing if it’s sealed)
- A gasket that sits flush and is easy to remove/clean (if included)
- A wide enough opening for a scoop (for flour, sugar, rice)
- A base that doesn’t tip easily when you scoop
Watch-outs
- Overly complicated lids: if it’s annoying to open, you’ll avoid using it
- Gaskets that trap crumbs: choose designs that clean easily
- Lids that warp over time (often the weak point)
Stackable pantry storage containers: the vertical-space advantage
Stackable containers are all about using shelf height efficiently. They’re a great choice when you have deep shelves, limited cabinets, or you’re trying to keep categories together.
Best for
- Snacks and small items you want grouped in one zone
- Meal prep staples you grab frequently
- Shelves where you want to build a clean “block” of containers
What to look for
- Flat lids and stable bases (no wobble)
- Consistent footprints across sizes (stacking stays neat)
- Clear sides for quick inventory checks
- A shape that maximizes shelf space (square/rectangular often wins)
Common mistake
Stackable doesn’t help if the containers aren’t uniform. Mixing random shapes usually creates uneven stacks and wasted space.
Modular pantry containers: the easiest way to stay organized long-term
Modular systems use consistent footprints and proportions (think small/medium/large that match). They’re the easiest choice if you want a pantry that stays organized as you add more containers over time.
Best for
- A full pantry reset (you want everything to look and stack consistently)
- Households that restock often and want a predictable system
- People who hate mismatched lids and random shapes
What to look for
- A few standard heights (low/medium/tall) using the same base footprint
- Lids that match across sizes
- Containers that are easy to label
- A shape that aligns with your shelf depth (so you don’t waste space behind them)
Round vs square: which is better for a pantry?
For most pantries, square or rectangular containers store more efficiently because they reduce dead space on shelves. Round containers can still work well for certain items, but if your goal is maximum organization and capacity, uniform square footprints are usually the easiest win.
Sizes and quantities: build a pantry kit that makes sense
Instead of buying one massive set, build a kit based on categories and shelf height.
A practical starter kit (most pantries)
- 4–6 medium containers (rice, pasta, oats, cereal refills)
- 4–8 small containers (snacks, nuts, baking add-ins)
- 2–4 tall containers (flour, sugar, cereal—only if shelf height allows)
If you bake often
- One extra-large container for flour (wide mouth for scooping)
- One medium for sugar
- One medium for oats
- A small container set for chocolate chips, nuts, toppings
Labels and visibility: the underrated pantry upgrade
Labels turn your pantry from “aesthetic” into functional. They help everyone in the home put things back correctly and avoid buying duplicates.
- Label the item name (simple and bold)
- Optional: add a purchase date if you like rotation
- Keep a consistent label position (top-right or centered)
- Use clear containers so you can see quantity at a glance
A simple 30-minute pantry setup plan
- Step 1: Empty one shelf zone (baking, breakfast, snacks)
- Step 2: Toss expired items and combine duplicates
- Step 3: Measure shelf height and depth
- Step 4: Choose containers by category (airtight for baking, stackable/modular for snacks and staples)
- Step 5: Transfer essentials, label, and keep refills in a backstock zone
Who these containers are best for (and who they’re not)
Pantry containers are a great fit if:
- You want cleaner shelves and easier inventory tracking
- You’re tired of half-open bags and clips
- You want a system that stays organized over time
- They may not be necessary if:
- You rarely store dry goods for long periods
- Your pantry space is extremely limited and you prefer original packaging
- You’re still deciding your pantry layout (start small before a full reset)
Next step: shop pantry-friendly options
Start with one shelf zone (baking or breakfast), choose a consistent footprint, and label as you go. Once you see what sizes you use most, expanding your pantry system becomes easy.
Explore related collections and guides above to build your setup.