

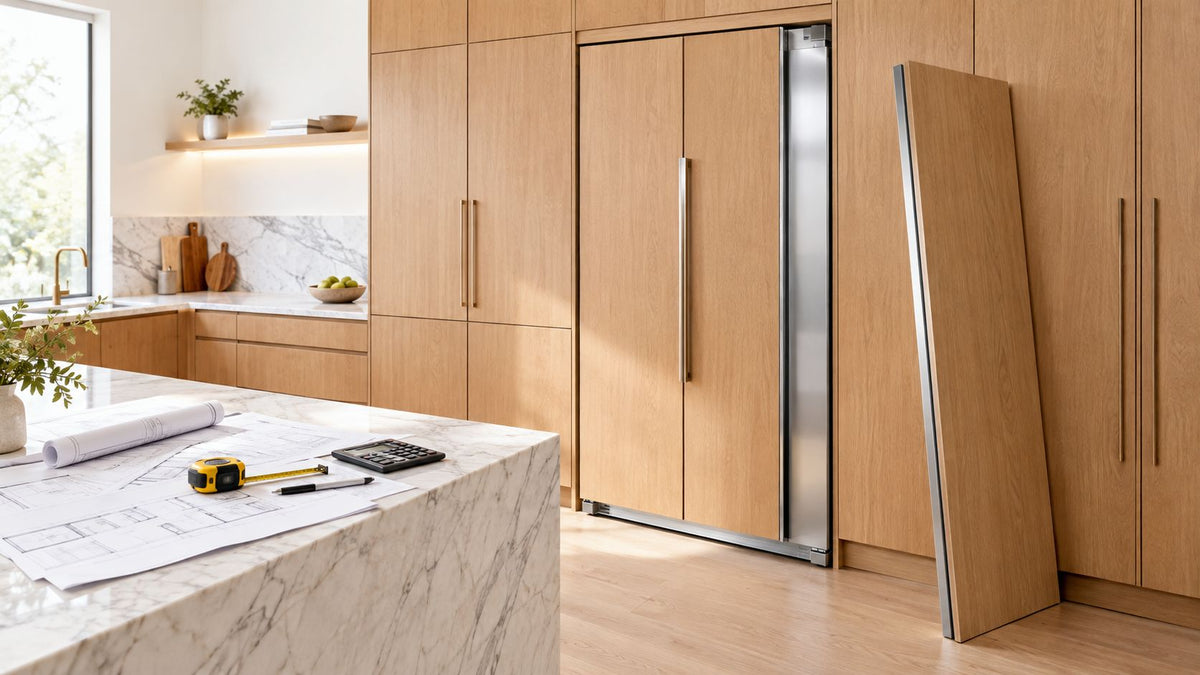
“Panel ready” sounds like a finish choice. It isn't. It's an installation project that affects cabinet dimensions, ventilation, hinges, electrical access, delivery, servicing, and the cost of replacing the appliance later. Buy the fridge first and measure afterwards, and you can end up with a beautiful cabinet opening that cannot safely accept the unit you ordered.
A panel ready fridge can make a kitchen look calm and architectural, but only when the manufacturer's installation drawing agrees with the actual room. The marketing width is a starting point, not a fit guarantee. This guide covers what panel ready really means, how to plan the installation without expensive surprises, and when a freestanding refrigerator is the smarter choice. If you're a renter, start with the situation comparison; if you're renovating, go straight to the sizing and systems sections; if you manage properties, use the worksheet and decision matrix at the end. For cabinet depth context, compare your plans with GrifGlo's kitchen cabinet depth guide.
Table of Contents
- Why Your Fridge Should Be an Installation Plan, Not a Finish
- Panel Ready, Integrated and Counter Depth Compared Clearly
- Sizing the Cabinet Opening Without Guesswork
- Ventilation, Electrical and Water Line Planning
- Real Cost Beyond the Sticker Price
- Which Refrigerator Style Actually Fits Your Situation
- Pre-Installation Worksheet and Yearly Maintenance
- Choosing Right by Household Type
Why Your Fridge Should Be an Installation Plan, Not a Finish
A homeowner recently selected a “36-inch” panel ready refrigerator for a renovation, then discovered the framed opening was too narrow once the required side clearance, finished door panel, and hinge movement were accounted for. The unit itself wasn't defective. The plan was. The cabinet maker had designed around the headline width instead of the installation drawing.
That mistake is common because panel ready appliances look like cabinetry products in showroom photographs. They aren't. The refrigerator still needs manufacturer-approved hinges, airflow, anti-tip protection, electrical access, and enough room for the door and attached panel to move without striking neighbouring fronts.
Practical rule: Order the refrigerator only after the cabinet maker, electrician, installer, and delivery team have reviewed the same model-specific drawing.
The visual benefit is real. A cabinet-matched front removes the exposed appliance finish and can make a kitchen wall feel more continuous. But the design gain comes with a more demanding fit. A panel that's too thick can interfere with adjacent doors. A cabinet surround that's too tight can block ventilation. An inaccessible receptacle can turn a simple service visit into cabinet removal.
Three decisions determine whether the purchase makes sense:
- Definition: Decide whether you need panel ready, fully integrated, counter-depth, freestanding, or a column configuration.
- Engineering: Confirm the opening, finished depth, ventilation route, panel specifications, hinge swing, electrical location, water line, anti-tip hardware, and delivery path.
- Value: Compare the complete installation and ownership burden with a refrigerator that can be installed, serviced, and replaced more easily.
A panel ready fridge is a good fit for a long-term homeowner who's already commissioning custom cabinetry. It's usually a poor fit for a renter, a temporary property, or a kitchen where the cabinets cannot be modified.
Panel Ready, Integrated and Counter Depth Compared Clearly
Think of a panel ready refrigerator as a cabinet box with a cooling appliance behind it. The appliance accepts a separate decorative front, usually made by the cabinet maker, so the refrigerator door can match the surrounding wood, laminate, or painted finish.
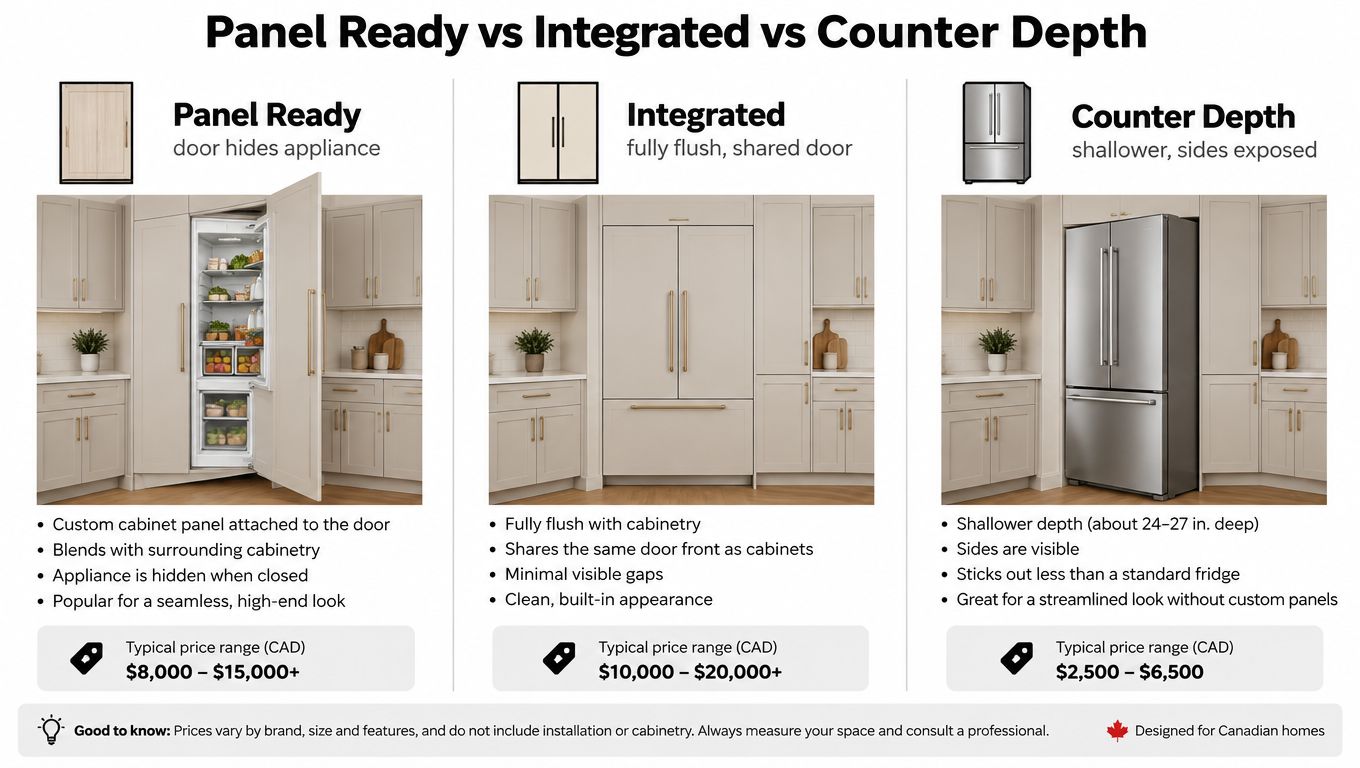
Fully integrated units belong to the same design family, but they're engineered to sit more completely within the cabinetry and often form part of a coordinated appliance suite. A panel ready model may still have visible trim or a slightly proud installation, depending on its hinge and cabinet design. “Integrated” shouldn't be treated as a universal promise of a perfectly flush wall. The drawing decides that.
Counter-depth refrigerators reduce how far the cabinet body projects into the room, but the front and sides generally remain visible. They're the practical middle option for shoppers who want a tidier profile without ordering a custom door panel. Use the countertop depth fridge guide to distinguish cabinet depth from the appliance's finished depth.
Freestanding is the default because it needs less cabinetry coordination. It usually arrives with its finished exterior, can be replaced with fewer alterations, and suits rentals or kitchens where flexibility matters more than a continuous cabinet wall.
A panel changes the engineering. Adding a wood or laminate front increases door load, which affects hinge selection, mounting hardware, door swing, and alignment. It can also make service access harder because the installer may need to remove the decorative panel before reaching the appliance door or controls.
The operating-cost question matters as much as appearance. California's 2019 Residential Appliance Saturation Study found that 97% of households owned at least one refrigerator, while primary refrigerators used an estimated 1,130 kWh annually, compared with 772 kWh in the 2009 study. The same study found that secondary and tertiary refrigerators averaged 1,081 kWh per unit, down from 1,212 kWh in 2009. These figures don't isolate panel ready models, but they show why the annual energy figure belongs in the purchase decision, not just the finish schedule. See the California appliance saturation study for the underlying figures.
Sizing the Cabinet Opening Without Guesswork
A panel-ready refrigerator is an installation project disguised as cabinetry. Measure the complete finished assembly, including the cabinet, appliance, door, decorative panel, handle, ventilation route, and removal path. The unit must fit, open fully, receive adequate airflow, and come back out for service.
Start with the finished opening
Begin with the manufacturer's exact opening width. Then add the side clearances, hinge movement, filler strips, and cabinet-wall conditions shown on the installation drawing. A refrigerator marketed as 36 inches may need a wider framed opening. The nominal appliance width does not dictate the joinery.
Before finalising the cabinetry, cross-check typical measurements in this kitchen appliance dimensions guide. Use it as a reference, then follow the selected model's installation document for the final opening.
Measure finished depth from the rear wall or service zone to the front face of the cabinet and decorative panel. A refrigerator can fit inside the box while projecting into the walkway once the door and panel are installed. Push it too far back, and the hinge may lack room or the ventilation route may be obstructed.
Canadian installation documents show why generic dimensions are inadequate. A Liebherr panel-ready model requires at least 200 cm² of effective air inlet and outlet, a 40 mm rear ventilation shaft, and a door panel between 16 and 19 mm thick, as specified in the Liebherr installation guide. Whirlpool Canada's installation specifications call for a 63.5 cm minimum cabinet depth for a flush installation and a 3.2 mm gap between the decorative panel and neighbouring cabinets. Check the exact document for the model you are buying.
Treat the panel as part of the appliance
Give the cabinet maker the permitted panel thickness, maximum weight, mounting points, grain direction, handle position, and finished dimensions. A front that looks correct in an elevation drawing can overload the hinges or strike the adjacent door.
Confirm top clearance, toe-kick construction, and anti-tip hardware before fabrication. Armoire-style surrounds may require a fixed board or bracket connected to a suitable structural point. Level the refrigerator before aligning the panel. Heavy doors make small installation errors obvious.
Use this worksheet before signing the purchase order:
| Item | Target | Why It Matters |
|---|---|---|
| Opening width | Manufacturer's exact opening width, including side clearance | Prevents hinge interference and cabinet damage |
| Finished depth | Cabinet, appliance, door, panel, and handle combined | Protects walkway space and door operation |
| Ventilation | Manufacturer's stated inlet, outlet, and rear shaft requirements | Keeps heat from accumulating around the appliance |
| Panel thickness | Exact permitted range, such as 16 to 19 mm where specified | Preserves hinge movement and mounting compatibility |
| Panel weight | At or below the model's stated limit | Avoids overloaded hinges and poor alignment |
| Door gap | Manufacturer's required gap, such as 3.2 mm where specified | Stops adjacent fronts from rubbing |
| Anti-tip system | Approved board, bracket, or restraint installed | Reduces movement and safety risk |
| Delivery route | Doorways, lifts, stairs, turns, and finished flooring checked | Prevents a fit problem before installation begins |
Renters and condo owners should be strict about the constraint. A panel-ready unit makes sense only when the existing opening meets the installation drawing and the property owner permits the work. Otherwise, choose a counter-depth or freestanding refrigerator that can be removed without rebuilding the cabinetry.
Ventilation, Electrical and Water Line Planning
Cabinetry hides the refrigerator, but it must not suffocate it. The cooling system needs the airflow route specified by the manufacturer. Closing off the top, rear, or toe-kick path can increase heat around the appliance, reduce efficiency, and create avoidable service and warranty disputes.
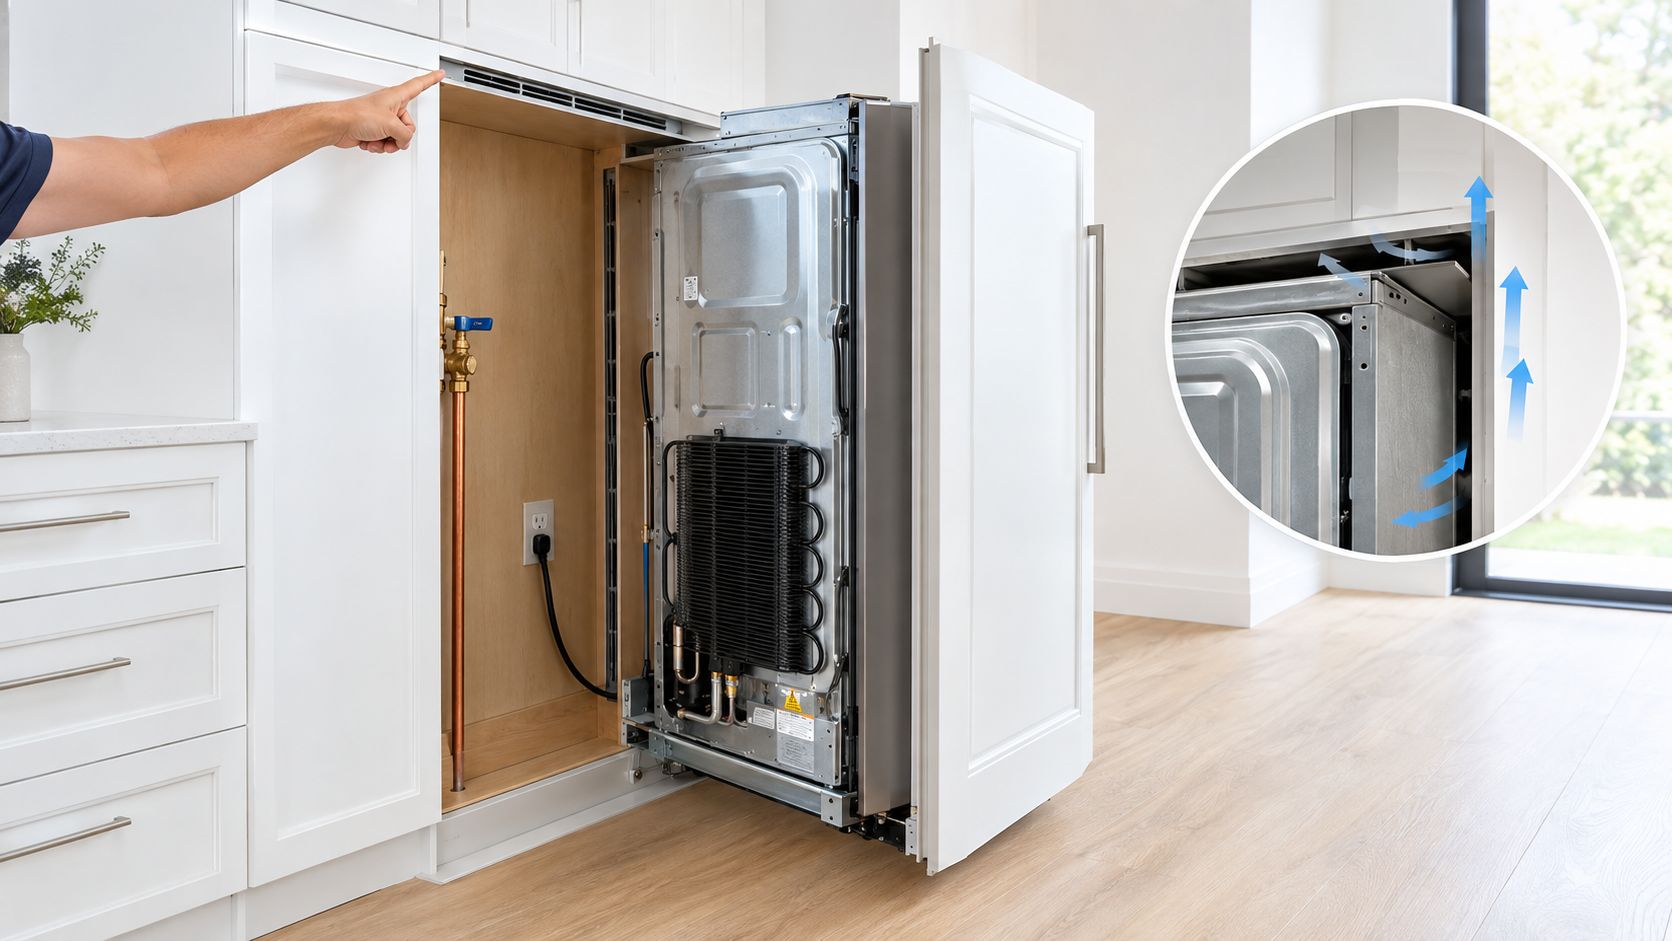
Keep the ventilation openings clear after the panel and cabinet trim are installed. Don't assume a decorative grille is equivalent to the specified effective opening. The Liebherr example above requires 200 cm² of effective inlet and outlet area and a 40 mm rear ventilation shaft, so the cabinet maker must preserve usable airflow rather than leave a visual gap.
Electrical planning deserves the same attention. Put the refrigerator on a clearly identified branch circuit where the project design calls for it, and position the receptacle so an electrician or service technician can reach it without dismantling the cabinet surround. Confirm the cord length, nameplate load, plug orientation, and manufacturer's clearance before closing the opening.
California's 2022 Energy Code requires covered new single-family homes with one or two dwelling units to be energy-storage-system-ready. The backed-up branch-circuit arrangement includes the refrigerator circuit, lighting near primary egress, and a sleeping-room receptacle circuit. The code support materials specify either energy-storage-ready interconnection equipment with at least 60 A of backed-up capacity and four ESS-supplied branch circuits, or a minimum 1-inch raceway from the main service panel to a qualifying subpanel. The main panelboard requirement is a minimum 225 A busbar rating. These provisions don't automatically apply to every remodel or appliance replacement, so check the project's permit date and the applicable California Electrical Code with your electrician. The CEC 2022 Energy Code support materials provide the governing context.
Water and ice add another route that installers often discover too late. Decide whether the line enters through the side, floor, or rear, keep the shutoff accessible, and avoid placing the connection where the unit cannot be pulled forward. If the refrigerator has a filter, leave room to remove it without taking off the cabinet panel. A planned replacement schedule is easier when the service point remains visible. GrifGlo's guide to refrigerator water filter replacement is useful for organising that maintenance task.
Garage and exterior-wall installations need extra scrutiny. Heat can make the appliance work harder, while cold conditions can affect water lines and temperature control. Read the model's permitted ambient-temperature range before placing a panel ready fridge in an unconditioned area.
Real Cost Beyond the Sticker Price
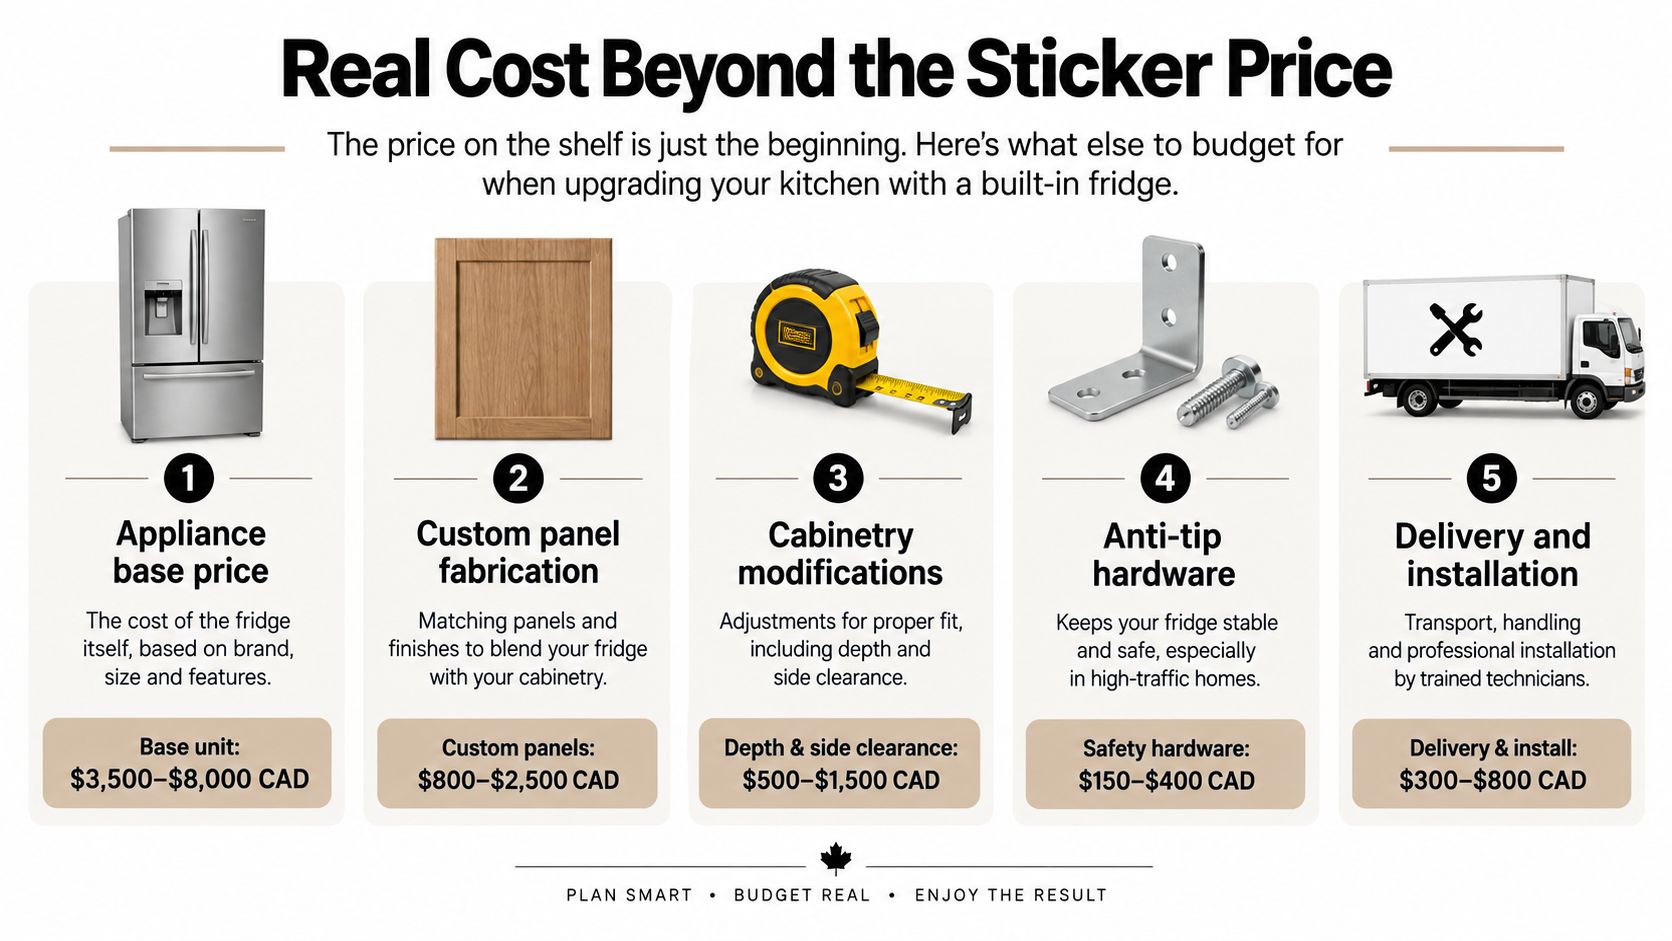
The appliance price is only the starting point. A panel ready installation may also require a custom door front, cabinet alterations, structural support, electrical work, water-line changes, specialised delivery, and a technician familiar with the hinge system. Treat the manufacturer's installation drawing as the cost-control document, not the advertised width.
Build the quote by scope
Request separate prices instead of accepting one vague installation figure:
- Appliance: The exact refrigerator model and configuration.
- Decorative panel: Fabrication, finish matching, edge treatment, handle preparation, and mounting.
- Cabinet work: Opening changes, fillers, deeper returns, ventilation routes, and trim.
- Safety hardware: Anti-tip boards, brackets, and required structural reinforcement.
- Services: Electrical alterations, receptacle relocation, water-line extension, and shutoff access.
- Delivery and placement: Door removal, lift or stair access, floor protection, and final positioning.
- Commissioning: Levelling, panel alignment, hinge adjustment, temperature checks, and packaging removal.
A counter-depth refrigerator usually avoids custom-panel and hinge-coordination costs. A freestanding model can reduce cabinet work further and make replacement easier. The trade-off is a less integrated appearance. You are choosing between visual coordination, installation complexity, service access, and future flexibility.
Energy use belongs in the same comparison. Canada's federal efficiency rules require regulated products, including refrigerators and refrigerator-freezers manufactured from January 1, 2025, to meet applicable standards when imported or shipped between provinces for sale or lease. That requirement sets a compliance floor, not proof that one format costs less to operate. Compare the appliance's EnerGuide information with usable storage, room conditions, service access, and installation materials. For a broader view of running costs and efficiency trade-offs, see GrifGlo's eco-friendly kitchen appliances guide.
A higher purchase price does not make a refrigerator the wiser choice if replacement remains difficult and your ownership horizon is unchanged. If you choose a panel, keep daily storage organised without blocking the door or airflow. The Magnet Shelf Rack for Refrigerator - Kitchen Organizer provides a hanging tray, a middle hook position for paper towels, and a bottom wooden rail for towels or kitchen tools.
Which Refrigerator Style Actually Fits Your Situation
The right refrigerator style follows your ownership plans and cabinet constraints, not the kitchen photograph you saved.
A panel ready built-in suits a long-term homeowner who is already ordering custom cabinetry and accepts specialised installation. It provides the coordinated front many renovators want, but service and replacement require more planning.
A fully integrated or column refrigerator fits a serious kitchen where refrigeration is treated as part of a complete appliance suite. It can offer a highly controlled cabinet composition, but it demands even closer coordination between the appliance, panels, hinges, and surrounding joinery.
A counter-depth refrigerator is the compromise I recommend most often when a client wants a cleaner profile without committing to a custom front. The sides and finished door remain visible, but the cabinet work and replacement process are more manageable.
A standard freestanding refrigerator is usually the smart choice for renters, frequent movers, budget-conscious renovators, and property owners who need easy replacement. It is less smooth, but it is also less dependent on one model's dimensions.
A French door configuration can work well for households that prioritise broad refrigerator access, but the door swing and handle clearance still need checking against walls, islands, and adjacent cabinets.
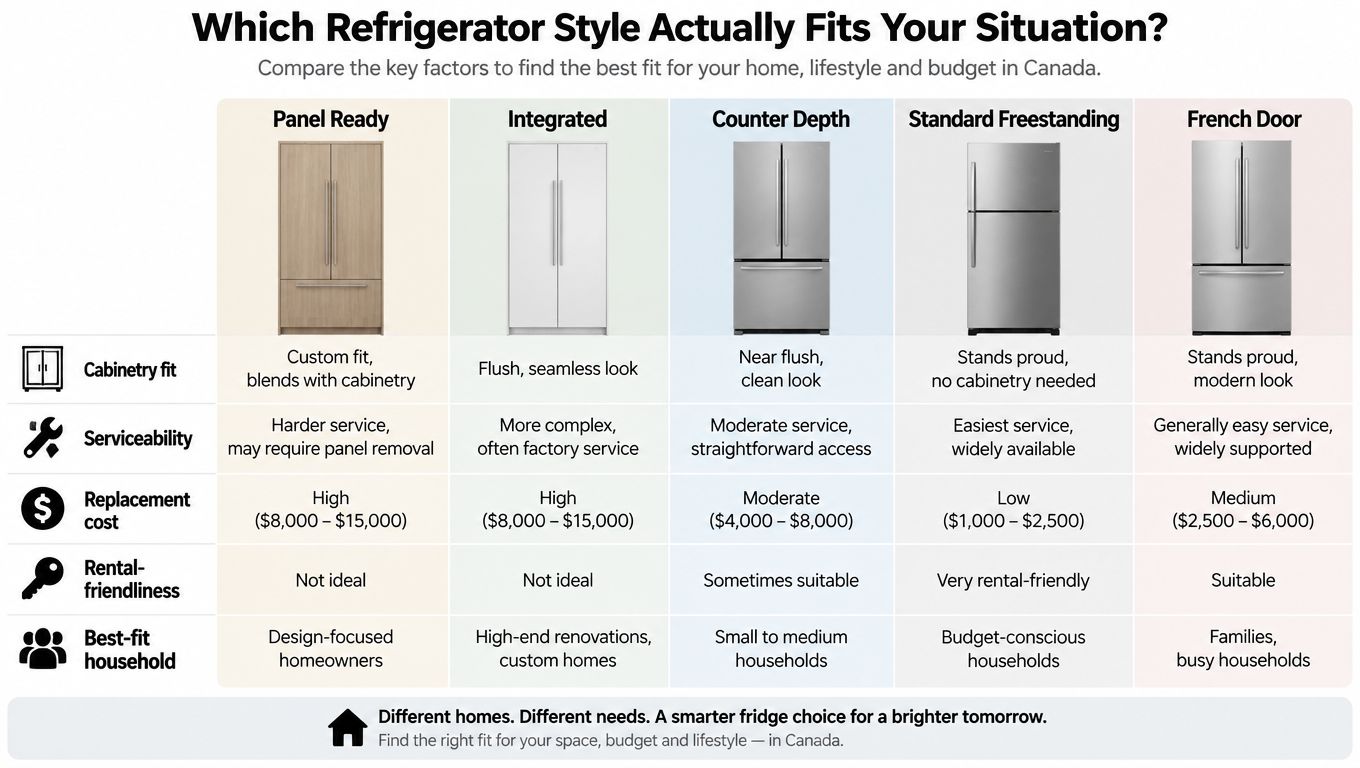
My rule is simple: choose panel ready for permanence, counter-depth for balance, and freestanding for flexibility. If your household may move before the kitchen feels established, don't spend heavily to make one appliance disappear into cabinetry you won't take with you.
Pre-Installation Worksheet and Yearly Maintenance
The week before delivery, treat the refrigerator like a small construction package. Confirm the exact model number, not merely the product family, and make sure the cabinet drawing, panel drawing, electrical plan, water route, and delivery plan all describe that same model.
In California, covered appliances sold or offered for sale must be certified in the California Energy Commission's Modernized Appliance Efficiency Database System, known as MAEDbS. Verify the exact model number in the CEC appliance efficiency programme information before specifying the unit for a home, rental, or hospitality project.
Delivery-week checks
- Model identity: Match the purchase order, carton label, installation drawing, and MAEDbS record where applicable.
- Cabinet fit: Confirm the opening width, finished depth, top clearance, toe-kick arrangement, and hinge-side clearance.
- Panel: Check thickness, weight, mounting points, handle position, finish, and delivery protection.
- Systems: Test the receptacle location, circuit access, water shutoff, line route, and ventilation openings.
- Travel path: Photograph the route from the street or loading area to the kitchen, including turns, lifts, stairs, flooring, and narrow doors.
- Hardware: Have the anti-tip system, fillers, brackets, and approved mounting components on site.
Maintenance should preserve both the appliance and the cabinet front. Wipe the gasket with a suitable damp cloth, remove debris before it hardens, and inspect the seal for distortion. Vacuum accessible condenser areas according to the manufacturer's instructions, and don't block the ventilation route with storage items.
Replace water filters on the manufacturer's schedule, check for leaks after every filter change, and inspect the panel fasteners if the door begins to sag or rub. If service requires panel removal, photograph the mounting locations first and label the hardware. Never let a technician improvise with screws that could penetrate the appliance door or interfere with the hinge.
Choosing Right by Household Type
A useful decision matrix makes the trade-offs obvious:
| Reader | Best Fit | Watch Out For |
|---|---|---|
| Renter | Freestanding or counter-depth | Lease restrictions, removal, floor and cabinet damage |
| Long-term homeowner | Panel ready built-in or integrated | Model-specific opening, panel weight, service access |
| Property manager | Freestanding or standard counter-depth | Replacement availability, installer consistency, tenant misuse |
| Small hospitality operator | Robust freestanding or carefully standardised panel ready | Repeatable sourcing, maintenance access, delivery routes |
Questions to settle before ordering
Does the installation need a permit?
That depends on the project, location, electrical changes, plumbing work, and local authority requirements. Ask the contractor or building department before work starts, especially when a new circuit, subpanel, water connection, or cabinet alteration is involved.
How do I compare efficiency ratings?
Use the applicable energy label or EnerGuide information, and compare products on the same test basis. Look at annual energy use alongside usable storage, room conditions, installation requirements, and service access.
What if the opening is wrong on delivery day?
Don't force the appliance into place. Photograph the opening and the model label, stop the installation, and have the cabinet maker and installer compare the measured conditions with the manufacturer's drawing. Forcing the unit can damage panels, hinges, flooring, and cabinetry.
What happens if the panel is damaged later?
Record the panel finish, material, thickness, hardware, and fabricator before the kitchen is completed. A replacement is far easier when the original specifications and finish details are documented.
The practical conclusion is straightforward. If the refrigerator must fit a permanent custom kitchen and you're prepared to coordinate the work, a panel ready fridge can be worth it. If you value easy replacement, low disruption, or rental-friendly ownership, choose a freestanding or counter-depth model and spend the difference on storage, lighting, or better cabinet hardware.
GrifGlo offers decision-friendly guides and product categories for kitchen appliances, refrigerator organisation, sizing, and practical home systems. Use GrifGlo to compare options before you order, then take the selected model's installation drawing to your cabinet maker and installer.


Leave a comment
This site is protected by hCaptcha and the hCaptcha Privacy Policy and Terms of Service apply.