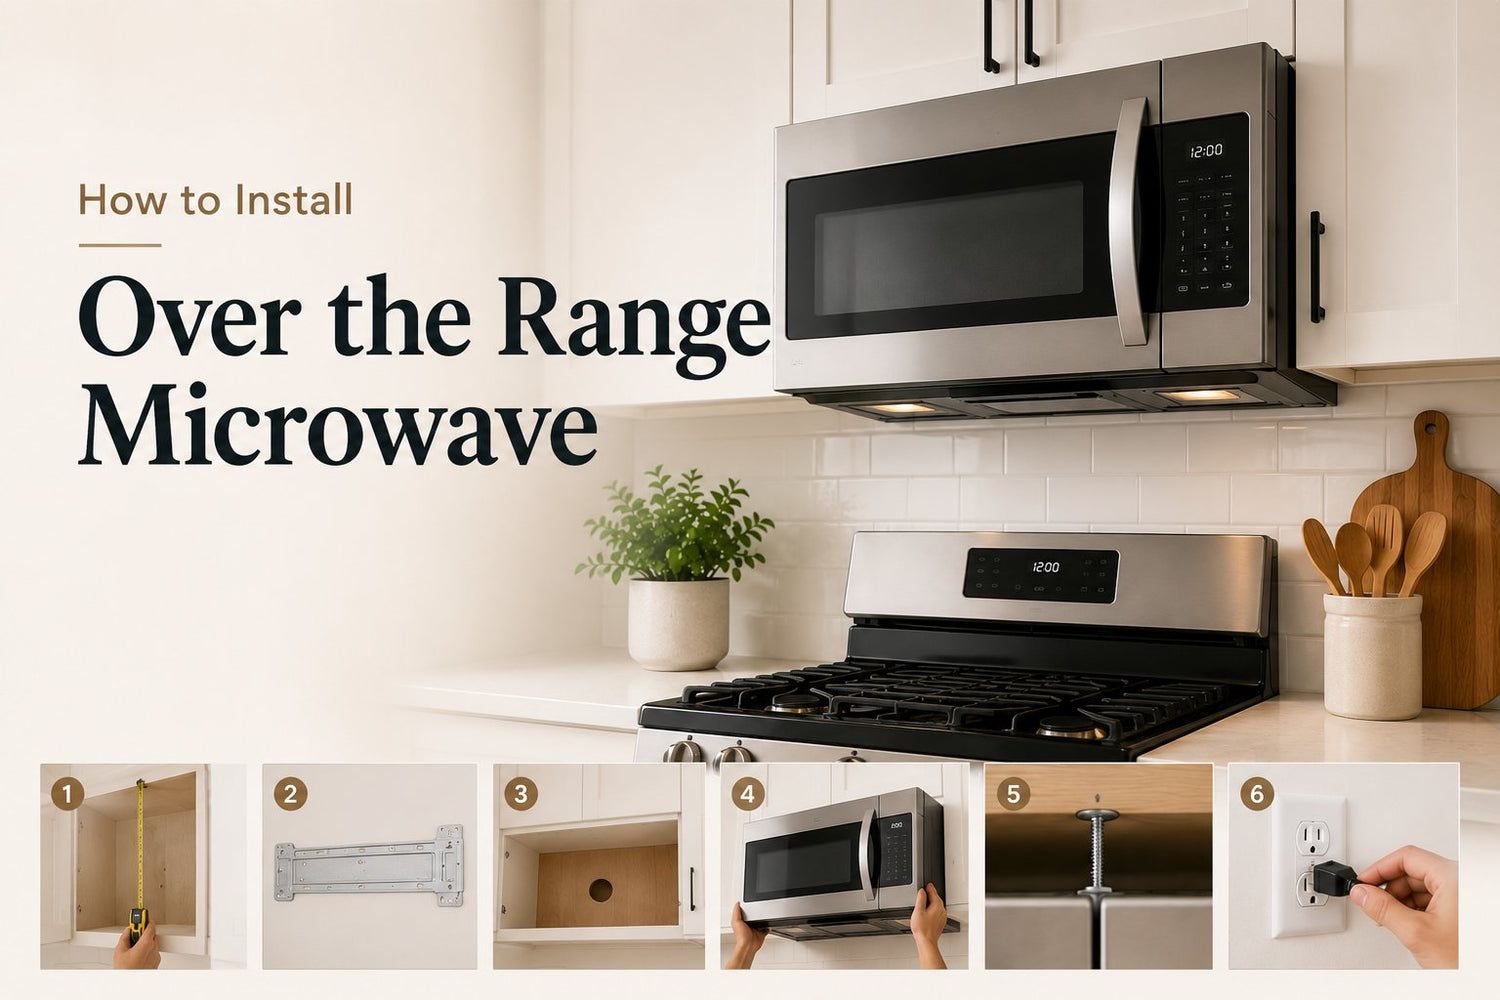
You've probably got the microwave box open, the old unit staring at you from above the range, and one immediate thought: this thing is heavier and more awkward than it looked in the shop photos.
That instinct is correct. An over-the-range microwave isn't hard in the same way tile work or plumbing is hard. It's hard because you're trying to line up templates, cabinet holes, a wall bracket, a power cord, and a bulky appliance that doesn't want to stay where you put it. Most failed installs don't happen because someone can't drill a hole. They happen because the prep was rushed, or because one person tried to muscle the unit into place alone.
The good news is that if you handle the planning properly and use a real buddy system, this is a very manageable DIY job. The official instructions matter. So do the small physical tricks that make the lift safer and the alignment less frustrating.
Table of Contents
- First Things First Planning Your Microwave Installation
- Clearing the Way Tools and Old Appliance Removal
- The Foundation Mounting the Bracket and Prepping the Cabinet
- The Main Event Lifting and Securing Your New Microwave
- Finishing Touches and Powering Up
- Common Problems Safety and Renter Considerations
First Things First Planning Your Microwave Installation
You can lose this job before the first hole is drilled. It usually happens when someone unboxes the microwave, lays out the bracket and templates, and assumes the hard part is fastening it to the wall. The harder part is making sure the space, the venting, and the lifting plan all work together before you and your helper are trapped under an awkward box over a hot range.
Planning matters more on an over-the-range microwave than on a countertop model because the unit is heavy, front-loaded, and difficult to hold in a comfortable position. One person can measure alone. Two people should plan the install.
Check the opening before you touch the packaging inserts
Measure the opening over the range with the old unit gone from your mental picture. Check the cabinet-to-cabinet width, the height from the cooking surface to the planned bottom of the microwave, and the depth of the upper cabinet. Then check how far the microwave door and handle will project once installed. An older unit can hide a bad fit for years, especially if it sat a little crooked or too low and everyone adapted to it.
A practical benchmark in California is at least 30 inches of clearance from the cooking surface to the bottom of the unit, along with using the manufacturer's wall template to locate the centreline, studs, and mounting holes before drilling, as outlined in this California-focused installation guide. That same guidance also notes that at least one fastener should be anchored into a wall stud, with toggle bolts commonly used for the remaining drywall anchor points when needed.
Practical rule: If the opening is tight on paper, it will be even tighter once your hands, drill, and appliance are in the space.
Check the upper cabinet too. Empty it completely. The person above needs room to guide the cord, start the top bolts, and look straight down at the hole locations while the person below carries most of the weight and keeps the microwave tilted at the right angle. If that cabinet is stuffed with food containers or small appliances, the whole lift gets clumsy fast.

A small prep step that pays off is clearing the storage around the range before install day. If the upper cabinet or nearby pantry is overloaded, fix that first so your helper has room to move and set tools down safely. This guide on organising your pantry with bins and zones is a useful starting point if the area around the stove has turned into overflow storage.
Confirm power and venting before you commit
Check the outlet location and the cord path before the microwave ever leaves the floor. The cord usually passes up through the upper cabinet, and that route needs to be clear, reachable, and close enough that the plug is not stretched or pinched when the unit is raised into position.
Venting needs the same kind of early check. If the kitchen already has exterior ducting, confirm where it exits and whether the new microwave matches that direction. If it does not, you may need to rotate the blower assembly inside the unit before installation. If the kitchen has no duct route, a recirculating setup is often the simpler choice, but only if the model supports it and the charcoal filter arrangement is correct.
This is also the moment to be honest about the electrical setup. In many retrofit kitchens and older homes, the microwave location looks ready until you find an outlet in the wrong spot, a cabinet hole that does not line up, or wiring that clearly belongs to an earlier appliance. Manufacturers commonly call for a dedicated outlet and secure top-cabinet mounting, and that matters most when the kitchen has been modified more than once.
The buddy-system part starts here, not at lift time. One person should stand back and question the fit while the other checks the template, cord route, and vent path against the actual cabinet and wall. That five-minute cross-check saves a lot of strain later, especially when you are holding a heavy microwave at shoulder height and trying to line up hidden holes you can no longer see.
Clearing the Way Tools and Old Appliance Removal
Before you remove a single screw, set up the room like you're about to move a piece of furniture through it. Clear the stovetop, cover the range if it's staying in place, and give your helper enough standing room to support the old unit without twisting sideways.
This part isn't glamorous, but a clean removal makes the rest of the install easier because you're not inheriting hidden problems under a rushed teardown.
What to gather before removal starts
A good over-the-range microwave install uses basic tools, but it uses them in the right order. Here's the checklist I'd want laid out on the counter before starting.

| Item | Category | Notes |
|---|---|---|
| Measuring tape | Layout | For opening width, cabinet depth, and hole placement |
| Stud finder | Layout | Helps confirm a solid anchor point in the wall |
| Level | Layout | Keeps bracket and template aligned |
| Pencil | Marking | Use for centreline, stud marks, and drill points |
| Painter's tape | Marking | Holds templates in place and protects surfaces |
| Drill and drill bits | Fastening | Needed for pilot holes and cabinet holes |
| Screwdrivers or driver bits | Fastening | For bracket screws and top bolts |
| Toggle bolts | Hardware | Used where wall fasteners aren't landing in studs |
| Lag screw hardware | Hardware | For the bracket location that hits a stud |
| Socket or nut driver | Fastening | Often easier than a screwdriver for top bolts |
| Safety glasses | Safety | Especially important while drilling upward |
| Work gloves | Safety | Useful for sheet metal edges and awkward grip points |
| Step stool or short ladder | Access | Gives the top-side installer a stable position |
| Drop cloth or cardboard | Protection | Protects range, counters, and floor |
| Helper | Essential support | This is not the place to improvise solo |
If you're also resetting the kitchen while appliances are out, it helps to sort utensils, cooking tools, and loose cabinet clutter before reinstalling anything. This guide on how to organise kitchen drawers is handy for that stage.
One small real-world note. Don't use the cabinet bottom as your tool shelf once removal starts. Put tools on the counter in a tray or box so they don't slide around while someone is holding weight underneath.
You might have another compact appliance nearby while the kitchen is in transition, such as the Hamilton Beach 35065C 3 Liter Digital Air Fryer, which is described as offering Crispy Taste. Less Oil. with a 3L compact capacity, 8 preset cooking functions, digital time & temperature control, and a nonstick easy-clean basket. It's not part of the install, of course, but clearing temporary appliances off the work surfaces gives you safer elbow room.
How to remove the old microwave without a cabinet dent
Start by cutting power to the appliance and unplugging it from the upper cabinet. If there's any doubt about what's energised, stop and confirm before touching wiring or metal housing.
The old unit usually comes off in a sequence that feels simple until the last bolt. From above, remove the top mounting bolts while your helper supports the bottom front of the microwave. Don't let the unit hang on one side while you fumble with the last fastener. That's how cabinet edges get chipped and wrists get strained.
Support the appliance before the final turn of the bolt, not after. Once that weight shifts, it shifts fast.
After the top bolts are out, tilt the front of the microwave downward slightly and lift it off the rear mounting plate. That rear hook point carries more of the load than people expect, so the motion is usually tilt first, then lift away, not yank straight out.
If the old unit seems stuck, check for three common causes:
- Paint or caulk adhesion: Some previous installs leave a bead where the appliance meets tile or cabinet.
- A hidden upper screw or washer: Look again inside the cabinet before forcing anything.
- A vent connection holding at the top: Ducted units sometimes need a bit more upward control during removal.
Set the old microwave down on cardboard, not directly on finished flooring. Then inspect the wall and cabinet bottom for old holes, crushed particleboard, loose trim, or duct openings that don't line up with the new model. Those details decide how smooth the next phase will be.
The Foundation Mounting the Bracket and Prepping the Cabinet
This is the part that determines whether the final lift feels controlled or chaotic. The bracket and cabinet holes create the entire support path for the appliance, so small measuring errors here show up later as top bolts that won't start, a cord hole that misses by an inch, or a microwave that won't sit flush against the wall.
Take your time with the templates. They look flimsy, but they're the map for the whole install.
Template work needs patience not strength
Manufacturers and retailers have largely converged on the same installation pattern: align the wall template on the centreline, secure the mounting plate with at least one lag screw into a wall stud, and use toggle bolts where studs aren't available for the remaining anchors. Lowe's describes that practical sequence in its over-the-range microwave replacement guide, and that approach lines up with how these installs are commonly handled under California's code-informed safety baseline.

Start by finding and marking the centre of the opening between the cabinets. Then locate the wall studs and mark those clearly. Use the wall template or mounting plate to transfer the bracket holes to the wall. Keep checking level as you go. If the bracket is out, the microwave will be out.
This is essential: at least one fastener needs to go into a wall stud. That gives the bracket a solid mechanical tie into framing. Toggle bolts help stabilise the rest of the plate where drywall alone would otherwise be too weak.
A few habits help here:
- Tape the template at eye level first: Don't hold it one-handed while marking. It always drifts.
- Mark the stud lines longer than the template area: That way you don't lose them when the paper comes down.
- Check for hidden services before drilling: California-focused retailer guidance stresses checking for wiring, ducting, gas, or water lines in retrofit installs before you drill.
A bracket can look straight and still be wrong if it's shifted off centre. Centre first, level second, holes third.
If the wall is uneven, don't ignore that. A bowed backsplash or old tile can change how the bracket sits. Hold the metal plate up before drilling all holes to see whether it lands flat enough for secure fastening.
For people sorting kitchen gear while the upper cabinet is emptied, a practical sizing guide for choosing food storage containers can help keep things from being tossed back in randomly once the work is done.
Drill the cabinet for the real install not the ideal one
Once the wall bracket is secure, move to the upper cabinet. The template for the cabinet bottom usually marks the power cord hole and the top-bolt locations. Tape it in place carefully and double-check that it matches the wall centreline you already established.
Drill the cord hole cleanly and make sure it's positioned so the plug and cord won't pinch when the microwave tilts upward into place. Then drill the top-bolt holes. If your installation uses vent ducting through the cabinet or wall, this is also the stage to cut or confirm those openings and verify that the blower orientation inside the microwave matches your vent plan.
The best cabinet prep is realistic, not theoretical. Look for obstacles inside the cabinet such as shelf pins, trim strips, outlet boxes, or a lip at the back that makes your socket driver harder to use. Those little obstructions matter when your helper is supporting the unit and asking if the bolts are started yet.
A good test is to stand on the stool, reach into the cabinet with the actual tool you'll use for the top bolts, and see whether your hand can work comfortably. If it can't, fix that now rather than during the lift.
The Main Event Lifting and Securing Your New Microwave
The buddy system then stops being a nice idea and becomes the whole method.
An over-the-range microwave is bulky in a very specific way. The weight isn't always terrible on paper, but the shape pulls your arms forward, blocks your view, and makes fine alignment harder than it should be. The rear bracket helps a lot, but only if both people move in sync.

How two people should handle the lift
Here's the cleanest way to do it.
One person takes the lower front corners. That person's job is to lift and control the tilt. The second person stands slightly higher and closer to the cabinet side, guiding the top rear edge and watching the cord, bracket, and cabinet-hole alignment.
Before lifting, tape the microwave door shut. Remove anything loose from inside. Dry-run the path with no weight first so both people know where they're stepping and how the tilt will work.
Then move in one sequence:
- Lift the microwave to chest height together.
- Tilt the unit so the back edge can catch the mounting plate.
- Hook the rear of the microwave onto the bracket.
- Keep upward pressure on the front while the top person feeds the power cord through the cabinet hole.
- Start the top bolts by hand before tightening either one fully.
That “hook the rear first” moment is the key move. Whirlpool's installation pattern describes the unit being tilted into position, the cord fed through the cabinet hole, and bolts driven into the upper cabinet after the appliance is held against the mounting plate, as shown in Whirlpool's guide to installing an over-the-range microwave.
If the microwave feels impossibly heavy halfway through, it usually isn't seated on the rear bracket yet.
That's the point where many people panic and think the wall plate is wrong. Sometimes it is. More often, the bottom front needs to come out a touch, then up, then back in. Tiny angle adjustments matter more than brute force.
A quick visual walkthrough can help if you want to compare hand positions and bracket engagement before lifting your own unit:
The trick that makes the top bolts easier
The most useful trick I know is simple: don't try to fully hold, align, and tighten all at once.
Once the rear is hooked, have the lower person keep steady upward pressure with forearms under the base, not hands spread wide at the sides. That gives better control and less wrist strain. The upper person should start one top bolt only a few turns, then start the second. Hand-thread them first. If a bolt doesn't start easily, back it out and realign. Cross-threading here turns a manageable install into an ugly one fast.
When both bolts are started, tighten them gradually, alternating side to side. That pulls the microwave up evenly against the cabinet instead of skewing one corner.
Watch for these signs during tightening:
- The cord is trapped or rubbing sharply: Stop and reposition it.
- One bolt pulls hard while the other won't catch: The unit is likely hanging slightly off-centre.
- The front edge looks dipped: The rear bracket may not be carrying the load properly.
The lift should feel controlled by the end, not forced. If it only goes together when one person is straining and the other is forcing bolts, something in the alignment needs another look.
Finishing Touches and Powering Up
Once the bolts are snug and the microwave is sitting properly, the job shifts from muscle to detail. At this point, you finish the parts many people skip because they're relieved the heavy bit is over.
Don't rush this stage. The fan setup, filters, and final testing tell you whether the install is actually complete or just hanging on the wall.
Set the venting pieces correctly
The blower and vent configuration need to match the setup you planned earlier. If the microwave is venting outside, make sure the internal fan orientation and duct connection match that route. If it's recirculating, install the parts intended for that mode and don't assume the factory setup is already correct.
Most units use metal grease filters regardless of venting style, because they catch grease from cooking air. Charcoal filters are typically part of recirculating setups, not exterior-vented ones. The important thing is to install the correct filter arrangement for your specific vent path and not leave the internal pieces half-configured after the mounting is done.

Plug the cord into the upper-cabinet outlet with enough slack that it isn't stretched tight across a sharp edge. Then tidy the cabinet interior so nothing rests against the cord or blocks access to the plug.
If you're building better appliance-cleaning habits after the install, this guide on how to clean an air fryer is a useful example of the kind of routine maintenance that keeps kitchen equipment working as intended.
Run a proper function check
Do a full check before putting tools away. I like to test in this order:
- Light first: Easy confirmation that power is on.
- Fan speeds next: Listen for normal operation and confirm airflow is going the direction you expect.
- Turntable operation: Make sure nothing was left inside that blocks movement.
- Heating test: Warm a mug of water briefly and confirm the microwave runs normally.
Also open and close the door several times. It should move smoothly and sit square. If the door looks slightly off, don't assume the door is the issue. Often the unit itself needs a small alignment correction at the mounting points.
Wipe fingerprints off the stainless finish last. That sounds cosmetic, but it's also a final close-up inspection for gaps, rocking, or trim contact you may have missed.
Common Problems Safety and Renter Considerations
The trouble usually shows up after the lift, not during it. The microwave can feel secure while you and your helper are still holding some of the weight, then reveal a gap, a twist, or a slight rock once you step back. That is why I always do one more hands-on check with a second person before calling the install complete.
A gap above the microwave usually means the top bolts pulled unevenly or the cabinet bottom is not perfectly flat. A rocking unit points to the rear bracket not fully catching or wall fasteners that never seated tight. If the door looks crooked, check the level of the whole appliance first. A lot of “bad door” complaints come from a microwave that went onto the bracket slightly off-center during the hardest part of the lift.
These are the fixes that solve the problem most often:
- Gap at the top: Back off the top bolts a little, support the front edge with your helper, then tighten both sides evenly.
- Unit rocks when touched: Lift slightly to confirm the rear bracket is fully engaged, then recheck the wall fasteners and top-bolt tension.
- Fan does not move air well: Verify the blower orientation and filter setup match your vent choice.
- Door clearance feels tight: Check nearby cabinet faces, filler strips, and side walls before assuming the microwave is misbuilt.
The physical part matters more than many guides admit. Over-the-range microwaves are heavy, but the bigger problem is that they are front-heavy and awkward to aim. One person usually ends up supporting the weight while also trying to line up the top bolts through the cabinet holes, and that is where scratched cabinets, bent brackets, and strained backs happen. The better approach is simple. One person lifts and keeps the unit hooked on the bracket. The other person watches alignment from above, feeds the cord, starts the bolts, and calls out left-right corrections before the weight shifts.
For renters, landlords, and property managers, permission is the first hurdle. This job means drilling the cabinet bottom, fastening into the wall, and sometimes changing the vent path, so reversibility matters. In apartments and condos, a recirculating setup is often the only realistic option, even if a ducted setup would clear cooking fumes better. If you are trying to make a small rental kitchen work harder without adding more permanent changes, these pantry storage rack ideas are a useful place to start.
Safety stays straightforward. Shut off power before drilling. Check for wiring, plumbing, and ducting behind the wall. Use the bracket and hardware specified for the unit. And do the lift with a buddy. This is one of those projects where a helper is not a convenience. It is what separates a clean install from a microwave that is just hanging on the wall.
If you're sorting out tools, kitchen setup, or appliance-related organisation after the install, GrifGlo is a practical place to compare home, kitchen, and storage essentials through decision-friendly guides rather than a giant undifferentiated catalogue.


Laisser un commentaire
Ce site est protégé par hCaptcha, et la Politique de confidentialité et les Conditions de service de hCaptcha s’appliquent.