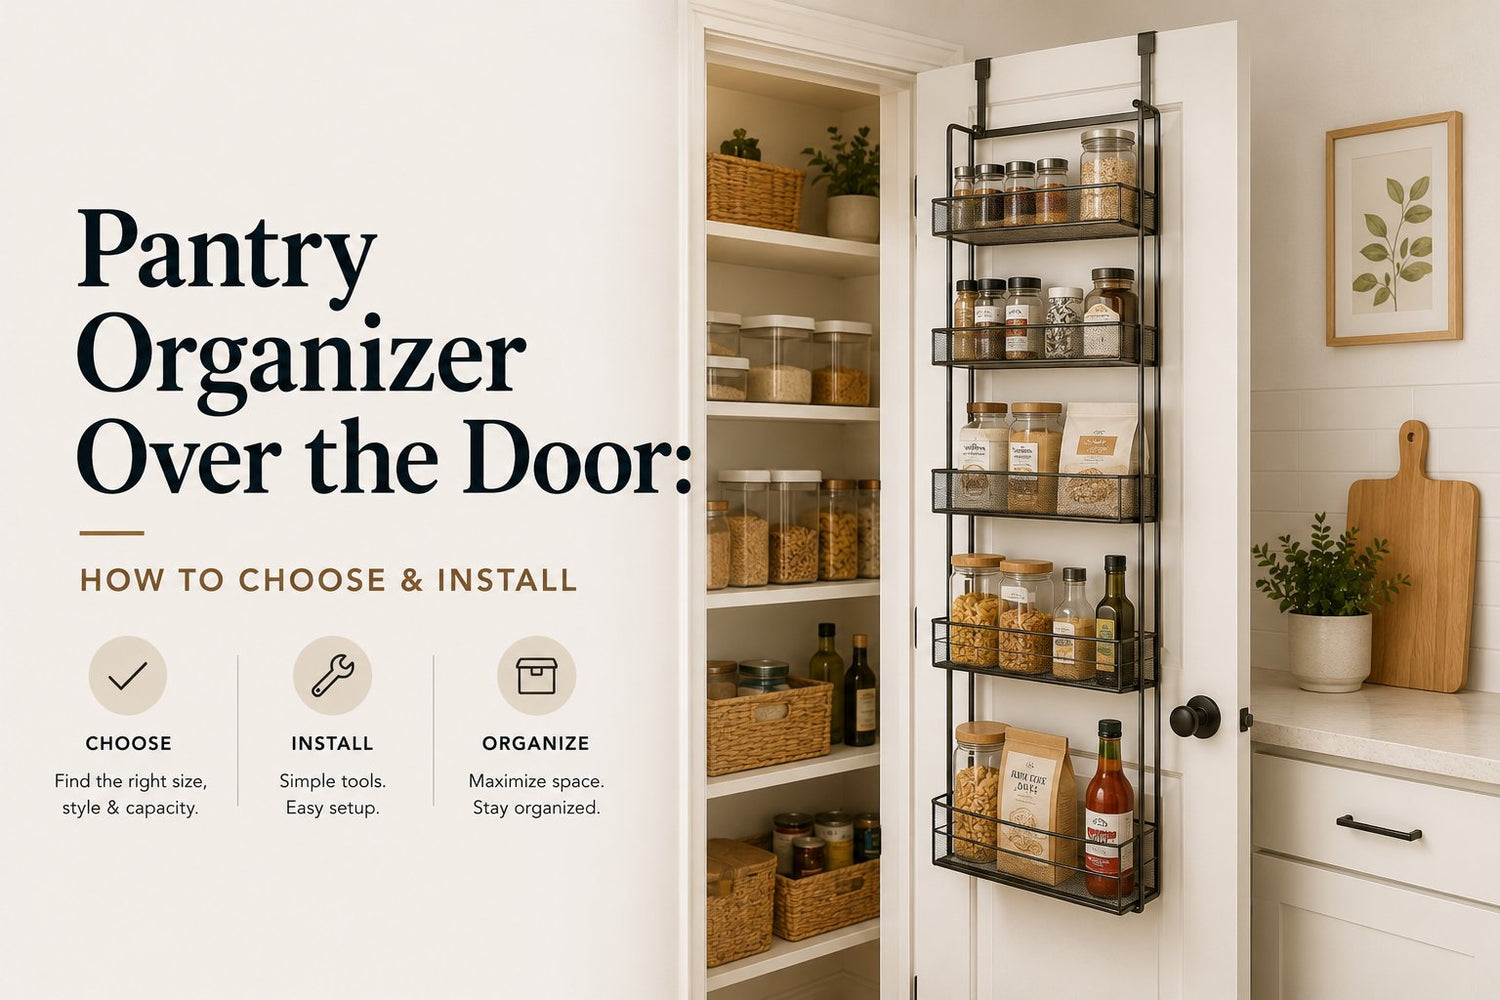
You're probably here because the pantry is full, the cupboards are awkward, and the back of a door looks like wasted space. An over-the-door rack seems like the easy fix until you hang one up and realise the door won't close, the frame gets scuffed, or the baskets are too shallow for the items you commonly use.
That's the gap most product listings leave open. They tell you how many tiers a rack has. They don't tell you whether your trim is too tight, whether your canned goods will make it sway, or whether the lower baskets will bang the door every time someone grabs a snack. A good pantry organizer over the door should solve a storage problem, not create three new ones.
Table of Contents
- Before You Buy Measuring for the Perfect Fit
- How to Choose the Best Over-the-Door Organizer
- A Guide to Secure Installation and Hanging
- Organizing Your Pantry Rack Like a Pro
- Common Problems and Smart Alternatives
Before You Buy Measuring for the Perfect Fit
Most returns happen before the box is even opened. The wrong rack gets bought because the shopper measured the door width, then guessed the rest.
In California, roughly 44% of households are renter-occupied according to the U.S. Census Bureau, which helps explain why non-permanent storage gets so much attention in apartments and condos. Over-the-door organisers suit that reality because they add vertical storage without drilling into walls or changing cabinetry, as noted in this California retail overview of renter-friendly pantry organisers.
The five measurements that matter

Take a tape measure and write these down before you browse anything.
-
Door thickness
This tells you whether the hooks will sit properly over the top edge. If the hook is too tight, it can crush paint or sit crooked. If it's too loose, the whole rack shifts every time the door moves. -
Top clearance
Measure the gap between the top of the door and the frame while the door is closed. This is the step people skip most often. A rack can technically fit the door and still stop it from latching because the hook hardware is too thick. -
Door height
Full-length organisers can hang lower than expected. You need enough clearance so the bottom basket doesn't drag on the floor or scrape the baseboard during swings. -
Door width
This matters if the rack is wide, if the door opens near a side wall, or if there's trim that narrows the opening. Some racks look slim in photos and feel bulky once the baskets are loaded. -
Side and back clearance
Open the door fully and look at the path it takes. Check nearby walls, adjacent cabinets, knobs, and trim. Also check what sits behind the door when it opens. A rack that clears the frame may still hit a wall or force the door to stop short.
Practical rule: If the door already closes tightly or rubs anywhere, assume an over-the-door unit will magnify that problem.
If you're organising a pantry door that also matters for privacy or security, don't forget the door still has to function cleanly. A simple wedge like the 125dB Door Stop Alarm - Portable Security Wedge is a separate tool, but it's a useful reminder that added hardware at the door base or top changes how the door behaves. Extra Security. Zero Setup. It uses a 125dB alarm, a wedge shape for physical door blocking, and a vibration-triggered alert for tampering or forced entry.
Measure your food, not just your door
The second mistake is buying for shelf count instead of actual contents. Six tiers sounds generous until you try to fit oil bottles, jars, snack pouches, and tall vinegar containers in baskets made for spice jars.
Do a five-minute inventory. Group what you want to store into a few rough categories:
- Heavy and dense like cans, jars, and bottled sauces
- Tall and awkward like oils, sprays, and vinegar
- Bulky but light like chips, bread, and snack bags
- Small loose items like seasoning packets, gravy mixes, and tea
A quick container audit helps here too. If your dry goods are all decanted, your basket needs may be very different from a pantry full of original packaging. This guide to food storage container sizes helps clarify what typically takes up more room than people expect.
A buyer who measures only the door usually shops twice. A buyer who measures the door and the food usually gets it right the first time.
How to Choose the Best Over-the-Door Organizer
A product page usually leads with tier count, finish, and lifestyle photos. None of those tell you whether the rack will suit your pantry habits. The better way to choose is to match the rack's structure to the items you plan to store.
Modern organisers are more engineered than they used to be. Some kits from Organized Living are built around a counted can capacity, which shows how the category has moved from basic wire shelves to more structured storage systems, as shown in this Organized Living pantry door kit listing.
Read the product page like a checklist

Look for four things before you care about colour or style.
| What to check | What works | What often disappoints |
|---|---|---|
| Material | Powder-coated steel or sturdy wire for pantry staples | Thin plastic that flexes when loaded |
| Basket style | Mesh or solid-bottom baskets for small items | Wide wire gaps that drop packets and pouches |
| Adjustability | Shelves you can move as your pantry changes | Fixed spacing that wastes vertical room |
| Mounting details | Hooks plus pads, strips, or stabilisers | Hooks only, with no sway control |
Wire organisers are practical because you can see everything quickly. The trade-off is that tiny items can slip or tilt. Mesh baskets solve some of that. Solid plastic or acrylic styles are easier to wipe clean, but they can feel bulkier and sometimes eat into usable depth.
Adjustability matters more than people think. A rack that fits your spice jars today may need to hold lunch containers or baking supplies later. If the shelves don't move, the rack becomes a one-purpose tool.
A pantry rack isn't useful because it has many tiers. It's useful when the spacing matches the tallest and heaviest things you reach for every week.
Good better best by household need
Not everyone needs a full-height unit. The right format depends on traffic, weight, and how often the door gets used.
-
Good for light overflow
A lighter rack with shallower baskets works for spices, packets, wraps, and snack bars. This is usually enough if your main pantry storage already exists and the door is just handling extras. -
Better for mixed pantry use
A rack with adjustable baskets is the safest middle ground. You can reserve deeper sections for boxed mixes and bottles, and shallower ones for small jars or pouches. -
Best for heavy pantry duty
Choose a sturdier steel frame with stable hooks, deeper lower baskets, and some kind of anti-sway support. This is the setup for households storing cans, sauces, backup condiments, and daily snack stock.
If your pantry system includes decanted staples, stackable bins, and labelled categories, it helps to compare the rack with the rest of the storage plan instead of treating it as a standalone purchase. This breakdown of airtight vs stackable vs modular pantry storage containers is useful when you're deciding whether the door should hold loose items, refill stock, or everyday grab-and-go food.
The best organiser on paper still fails if the baskets are wrong for your routine. Choose for fit first, then load type, then finish.
A Guide to Secure Installation and Hanging
A pantry rack should feel quiet and planted once it's up. If it rattles, shifts, or leans away from the door, the problem usually isn't the rack alone. It's the install.
One important benchmark is door compatibility. Smart Design's 8-tier model says its patented hooks fit 99% of residential doors and uses wall-safe sticky strips to reduce sway, which points to the bigger lesson: wobble is the most common failure, and weight distribution matters as much as hook design in rental-friendly installs, according to this Smart Design over-the-door organiser listing.

Set it up before it goes on the door
Assemble the frame on the floor first. Tighten everything enough to remove wobble, but don't overtighten early if the unit needs slight adjustment as the shelves go in.
Use this order:
- Lay out all parts so you can spot duplicate lengths and matching side rails.
- Build the frame square on a flat floor, not leaning against the wall.
- Install baskets loosely at first if the model allows adjustment.
- Test hang the empty unit before you final-tighten anything.
- Close the door slowly and listen for resistance, scraping, or latch pressure.
A lot of frame noise comes from small misalignment during assembly. If one side rail twists even slightly, the baskets won't sit level and the rack will feel unstable even when the hooks fit.
Stop sway before you load it
Most sway starts at the bottom third of the rack. The door opens, the weight shifts, and the lower baskets start acting like a pendulum.
Three fixes usually solve it:
- Use the included pads or sticky strips if the unit comes with them. They aren't filler. They create a contact point so the frame doesn't float off the door.
- Centre the rack carefully before pressing any adhesive support into place. A crooked install makes the swing worse.
- Load the heaviest items around mid-height rather than at the very top or very bottom. That reduces torque on the hooks and makes the door feel less top-heavy.
If the door moves first and the rack follows a split second later, the rack isn't secured well enough.
A visual walkthrough can help if you're dealing with hook placement, basket alignment, or adhesive stabilisers:
For homeowners, some systems allow wall-mount hardware or screw-in stability. That can make sense on an inside pantry face where permanence isn't a concern. In rentals, the safer route is still a no-drill setup plus careful balancing. If you're comparing more fixed and freestanding formats, this guide to pantry storage racks is a useful side-by-side reference.
Protect the frame too. If the top hooks leave marks, add a thin barrier approved for painted surfaces rather than forcing the metal tighter. A snug fit is good. A jammed fit usually ends in chipped paint.
Organizing Your Pantry Rack Like a Pro
Once the rack is installed, the next mistake is filling it in whatever order the groceries come out of the bag. That's how you end up with olive oil above eye level, snack bars buried under soup cans, and a door that suddenly feels much heavier than it should.
The practical issue isn't just volume. It's basket depth. A Smart Design 6-tier unit sold through Sam's Club lists dimensions of 6.7 x 18.5 x 63.2 inches and highlights basket depth differences across its wire system. The useful lesson is that tier count alone doesn't tell you much. Standard baskets suit spice jars and small cans, while deeper baskets handle boxed mixes and taller bottles more safely, as shown in this Smart Design 6-tier organiser listing.

Build zones that match real use
The easiest racks to maintain are organised by behaviour, not by grocery-store category. Put things where people naturally reach.
A few layouts work well in real kitchens:
-
Family snack zone
Keep lower or mid-level baskets for bars, crackers, fruit pouches, and lunchbox items. That makes them easy to grab and easier to restock. -
Cooking zone
Put oils, sauces, seasoning blends, and canned staples together if they're used during meal prep. Don't split them across top and bottom baskets unless you enjoy hunting while the stove is on. -
Baking zone
Use one section for vanilla, baking powder, sprinkles, cocoa, and small decorating items. If the rack has wire baskets, drop smaller packets into a compact bin so they don't slide.
Small items don't need more shelves. They need containment inside the shelf they're already in.
If you want a broader system around the rack, this guide on how to organize your pantry with bins and zones is useful for connecting the door storage to the rest of the pantry.
Load for stability first and convenience second
People often hear “put heavy items low” and follow it too strictly. On a door-mounted rack, the very bottom isn't always the best place for the densest items if that area swings the widest or bumps trim.
A better loading pattern looks like this:
| Rack area | Best use |
|---|---|
| Top baskets | Light, rarely used items like backup spices, tea, seasoning packets |
| Eye-level baskets | Everyday items you want fast, such as snacks, sauces, breakfast supplies |
| Mid-lower baskets | Heavier cans, jars, and stable boxed goods |
| Lowest basket | Bulky but lighter items, or a small overflow bin |
Household scenarios prove useful.
A busy family might keep grab-and-go snacks at child height, with heavier pasta sauces one tier below eye level. A home baker might use the upper shelves for cupcake liners and extracts, then reserve a deeper centre basket for sugars and smaller flour packs. A small flat with no real pantry may use the door for all backstock and keep only daily staples in the cabinet.
Keep some breathing room. A basket packed to the rim tends to spill, snag labels, and shift weight unpredictably during door swings. The rack should feel organised when the door moves, not just when it's standing still.
Common Problems and Smart Alternatives
Some doors are not good candidates for a pantry organizer over the door. That's not a failure. It's a fit problem, and fit problems don't get solved by buying a slimmer-looking version and hoping for the best.
Canadian shoppers run into this often because product pages usually list maximum door thickness but skip the main issue of door stack-up, including trim, weatherstripping, and latch-side clearance. That's a major gap for renters and apartment dwellers, especially in places like Ontario and British Columbia, as noted in this VEVOR over-the-door organiser listing and fit discussion.
When an over-the-door rack is the wrong tool
If any of these sound familiar, stop forcing the idea.
-
The door barely closes now
Tight clearances, weatherstripping, and thick trim leave almost no tolerance for top hooks. -
The door opens into a narrow walkway
A loaded rack adds bulk. In a compact kitchen or hallway, that can turn the door into a daily nuisance. -
The door is lightweight and flexes
Hollow-core doors can handle some load, but they don't love badly distributed weight or repeated slamming. -
You need to store mostly heavy liquids and cans
A door rack can hold some dense items, but a floor-based or cabinet-based system is often the better long-term choice.
The wrong over-the-door rack doesn't just waste money. It makes the pantry harder to use every single day.
What to use instead
If the door is the problem, move the storage elsewhere.
Consider these swaps:
- Inside-cabinet organisers for spices, packets, and smaller jars
- Narrow rolling carts for canned goods, bottles, or backup pantry stock
- Wall-mounted or adhesive racks where drilling isn't allowed or the load is light
- Drawer inserts and divided bins when the issue is category chaos more than lack of space
For households trying to reclaim awkward storage without using the door at all, kitchen drawer organizers can solve a surprising amount of pantry overflow by moving wraps, packets, tools, and small accessories out of cupboards.
If you're comparing pantry storage options and want clearer buying guidance, GrifGlo publishes decision-focused guides across home and kitchen organisation, including sizing, fit, and real-use trade-offs that help shoppers avoid ordering the wrong setup for their space.
Leave a comment
This site is protected by hCaptcha and the hCaptcha Privacy Policy and Terms of Service apply.