

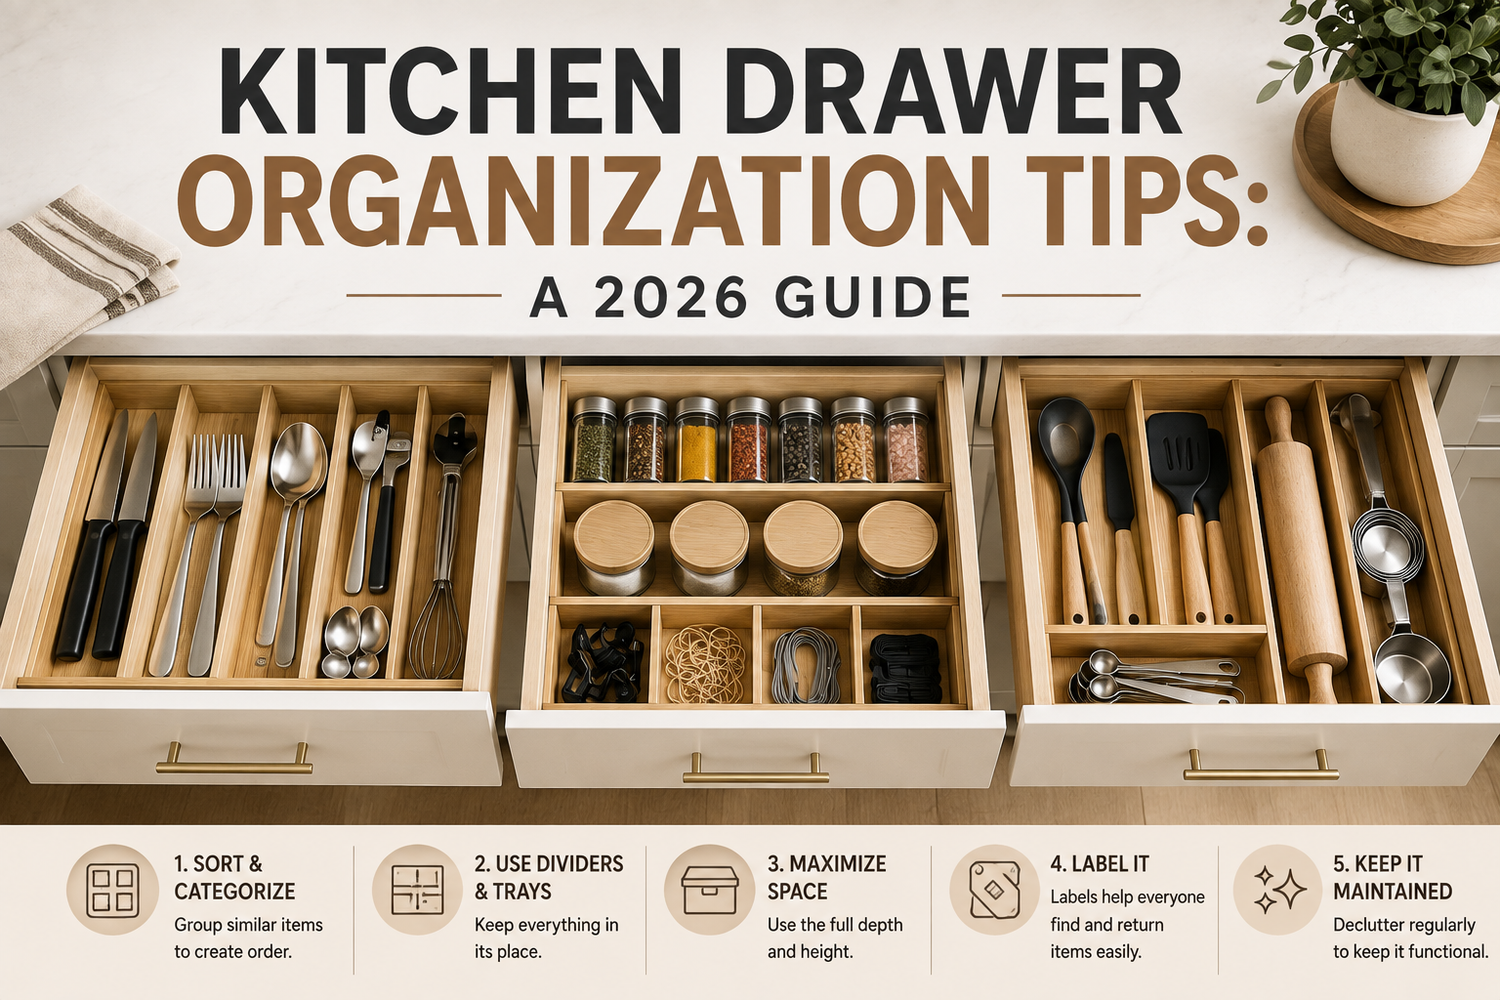
Tired of opening a kitchen drawer and finding a tangle of measuring spoons, rubber bands, garlic presses, and mystery lids? That mess adds friction to cooking fast, especially in smaller Canadian kitchens where every inch has to work harder. The good news is that kitchen drawer organization doesn't have to mean custom cabinetry or a full weekend overhaul. It usually comes down to better zoning, better fit, and a maintenance routine that keeps the system from sliding back into chaos.
The strongest modern approach is simple. Empty the drawer, group like with like, and give each zone a clear job. That matches the broader organizing trend toward space-saving systems, which sits inside a large and growing home-organization category, with the global kitchen storage and pantry organization products market valued at USD 131.43 billion in 2023 and projected to reach USD 182.08 billion by 2030 in a report from Grand View Research. In practical terms, that growth reflects how many households want drawer dividers, clear bins, and vertical inserts that make limited space easier to use.
These kitchen drawer organization tips lean on two ideas at once, product-based fixes and day-to-day habits. A drawer only stays organized when the setup matches how you cook, clean, and store tools. That's why the best systems balance access, capacity, and maintenance instead of trying to maximize item count at all costs.
Table of Contents
- 1. Drawer Dividers and Compartmentalization Systems
- 2. Utensil Inserts and Custom Trays
- 3. Vertical Drawer Organization with Upright Dividers
- 4. Labeled Drawer Systems and Color-Coding
- 5. Drawer Liners and Non-Slip Mats
- 6. Specialty Drawer Organizers for Specific Tools
- 7. Drawer Depth Maximization and Tiered Storage
- 8. Moisture Control and Ventilation in Drawers
- 9. Accessibility-Focused Drawer Organization
- 10. Seasonal Rotation and Intermittent-Use Item Storage
- Kitchen Drawer Organization: 10-Point Comparison
- Maintain Your Organized Oasis
1. Drawer Dividers and Compartmentalization Systems
Drawer dividers are the fastest way to stop a kitchen drawer from turning into one mixed pile. Once you divide the space into zones, the drawer does the sorting for you, which matters when utensils shift every time the drawer opens. A rule-based setup, like one drawer, one purpose, fits the way real kitchens work, because it reduces decisions at the point of use.
Start by measuring the drawer interior, then choose a divider style that matches the drawer's actual dimensions, not the packaging photo. Adjustable and modular systems work well when your utensil collection changes over time, while fixed dividers make more sense when a drawer holds a stable category, such as cooking tools only. A practical starting point is to build 4 to 6 sections, then adjust after a week of use if one zone keeps overflowing or another stays empty.
Practical rule: put the items you reach for most often in the easiest-to-open sections. If your spatula lives in the back corner, the layout is fighting your habits.
A mid-size kitchen may do well with a flexible system like the YouCopia DrawerStore system, while rental kitchens often benefit from simple bamboo dividers such as IKEA's UPPDATERING line because they are easy to remove when you move. If you are sorting kitchen tools for the first time, the ideas in kitchen utensil storage ideas can help you decide which tools belong together and which ones need their own section. In luxury renovations, custom wood dividers can match the cabinet finish and use more of the available space, but they only work well if your categories stay consistent.
For very shallow drawers, use shallow dividers so items do not pop up when you shut the drawer. For deeper drawers, keep the layout low enough that utensils do not stack into a messy second layer. Even something like a CONAIR BE05TSMC LED Hollywood Lighted Social Media Mirror can benefit from compartment thinking in a prep area, because the base holds a phone in place while the surrounding drawer zones stay clear and easy to use.
2. Utensil Inserts and Custom Trays
Utensil inserts work best when the drawer is already committed to cutlery, cooking tools, or prep utensils. A tray with shaped slots creates a home for each item, which cuts down on the daily shuffle that happens in mixed drawers. It also makes it easier to see when a category is overcrowded, because the tray shows you the limit immediately.
The best inserts are chosen by tool type, not by wishful thinking. Keep knives separate from mixed utensils, because safety matters more than convenience there. Group serving spoons apart from eating spoons, and keep specialty tools together so you're not digging through a tray just to find a citrus zester. If the drawer has an awkward shape, an expandable tray or custom-cut insert usually solves the problem better than forcing a standard tray to fit.

A practical detail many people skip is moisture. Wet utensils belong on the drying rack, not in an insert. If you put damp metal into a closed tray, you invite rust, mildew smell, and staining on the drawer base. Pulling the tray out weekly for cleaning helps, especially in busy homes where crumbs and moisture build up fast.
For a small kitchen, a 2 in 1 Pack Large Silicone Ice Cube Tray Mold can sit outside the utensil drawer entirely, which is a good reminder that not every useful kitchen item belongs in the same storage zone. In compact drawers, the goal is fewer overlaps and clearer categories, not squeezing every object into one container.
3. Vertical Drawer Organization with Upright Dividers
Vertical storage changes the way a drawer works. Instead of stacking baking sheets, cutting boards, or cooling racks flat on top of each other, you stand them upright in slots so each item is visible and easy to grab. That's a big win in drawers with enough depth, because flat stacking almost always hides the item you want at the bottom.
This works especially well for heavier pieces that tend to slide around. Keep cutting boards, sheet pans, and cast-iron pieces toward the back if the drawer is deep enough, then place lighter items toward the front. Adjustable dividers are better than fixed ones here, because your collection usually changes over time. If you buy one new baking tray or one new board, the system should still flex.
A vertical drawer should feel like a file cabinet, not a storage bin.
Measure depth first. If the drawer can't hold upright items without catching on the slide or lid, stop before you buy anything. In many homes, the best use of vertical dividers is not maximum quantity, it's cleaner access. A few slim sections often outperform one crowded slot filled with overlapping pans.
The trade-off is stability. Vertical systems are excellent for visibility, but they need a firm divider and enough weight balance to stay put. Start with three or four sections, then adjust after a few cooking sessions. Labeling each section can help in households where more than one person puts things away, especially when one person is likely to jam a rack into the wrong slot and undo the whole layout.
4. Labeled Drawer Systems and Color-Coding
Labels solve a simple but common problem. They show every person in the household where an item belongs before the drawer turns into a catch-all again. That matters in family kitchens, shared rentals, and short-term stays where the system has to be clear from the start.
Keep the language plain. Use labels like Baking Tools, Serving Utensils, or Gadgets, not clever names that only make sense to the person who made them. Waterproof label makers hold up better than handwritten tags, especially in kitchens where steam and cleaning products wear down paper quickly. If you use colour, keep it consistent across the whole kitchen so drawers do not become a random mix of signals. For a broader cabinet-wide setup, this guide to organizing kitchen cabinets can help you keep the same naming logic across shelves and drawers.
For rentals and guest kitchens, icon labels can cut down on confusion when visitors open drawers looking for basics. In office kitchens, laminated labels make sense because many different people use the same tools without long explanations. In a family kitchen, colour-coding can help children learn where smaller items belong without constant reminders.
A better habit is to review labels every few months and adjust the categories when your kitchen changes. That can happen after a move, a remodel, or a shift in cooking habits. If your “gadget” drawer becomes a baking drawer over time, relabel it instead of forcing the old system to survive on autopilot.
Labels only work when the drawer layout already makes sense. If the categories are too broad or too cramped, the labels just point to a poor setup. Clear naming helps maintenance, but it cannot fix a drawer that is overloaded or poorly zoned.
5. Drawer Liners and Non-Slip Mats
Drawer liners do more than protect a cabinet finish. They keep items from sliding, cushion the bottom surface, and create a cleaner barrier between tools and the drawer itself. That's especially helpful in drawers that hold metal utensils, glass jars, or anything that tends to drift when the drawer opens and closes.
Before you install a liner, clean the drawer surface thoroughly. Dust, crumbs, and grease make even a good liner fail sooner. Trim carefully so the edges sit flat, and leave a small border so the liner doesn't catch when the drawer glides shut. In humid homes, waterproof liners or non-slip mats are the smarter choice because they handle moisture better than decorative paper products.
For renters, liners are one of the easiest lease-safe upgrades you can make. They protect surfaces without any permanent change, and they're simple to replace when you move. That's one reason many organize-first households use them in combination with bamboo or rubber inserts. They stabilise the system underneath the system.
Practical insight: if a drawer is sliding around on its own, the organizer is doing too much work and the base is doing too little.
This is also a smart place to think about maintenance. Lift the liner occasionally and check for crumbs or trapped moisture. If the drawer smells stale, the liner may be holding onto debris instead of preventing it. Used well, liners extend the life of both the drawer and the organizers sitting inside it.
6. Specialty Drawer Organizers for Specific Tools
Some kitchen items need their own storage logic. Knives, peelers, pastry tools, spice gadgets, and baking accessories each bring different risks and different access needs. A specialty organizer makes sense when one category needs faster access, better protection, or both.
Knife storage is the clearest case. Keep blades away from general utensils, and make sure they do not rub against other tools. Padded inserts protect non-stick-coated tools, while compartment trays stop delicate gadgets from knocking into one another in the drawer. If you own an expensive set, it is smarter to put it in a better organizer than to force it into a cheap tray that will scratch the surface over time.
Modular systems earn their place because kitchen habits change. A family that bakes on weekends, cooks weekday meals, and entertains twice a month may need one organizer for everyday tools and another for specialty items. A small apartment kitchen may need a compact gadget tray that holds only the essentials and leaves the rest of the drawer free.
The right organizer fits the actual tool envelope, the shape and size of the items you own. That keeps you from buying a system that looks tidy online but wastes space once it is in the drawer. If the tool does not fit cleanly, the organizer is the wrong one.
This is also where trade-offs matter. Specialty organizers can cost more, and they can tempt you to separate items that do not really need it. Use them where speed, safety, or preservation matters most. Leave lower-risk items in a simpler zone, and keep the system practical enough to maintain after the first week.
For households updating knife storage, a cutlery set Canada option can fit neatly into a specialty drawer plan if the sizing matches the drawer and the way the tools are used. That kind of purchase works best when it supports daily access instead of forcing the drawer to adapt around it.
7. Drawer Depth Maximization and Tiered Storage
Tiered storage is useful when the drawer itself is deep enough to justify a second level. It creates more usable surface area without adding another drawer, which is why it shows up so often in small apartments, studio kitchens, and RV layouts. The upside is clear, but only if the drawer can still open smoothly and the layers don't become a hidden pile.
Start with one tier first. Add a second level only if the drawer still feels easy to use after the first layer is set. Heavy items belong on the bottom tier, while lightweight, frequent-use items sit on top so they're reachable without lifting half the drawer. If the drawer slides weren't built for the extra weight, don't force them to carry it.
The best tiered layouts stay open enough that you can still see what's there. Overfilling defeats the whole purpose and turns the drawer into a compressed stack of things you can't reach. Aim to leave breathing room in each level so the contents don't shift when the drawer moves.
This is also the right moment to think about compatibility with your cookware habits. Measuring cups, small prep bowls, and lightweight tools usually benefit from a shallow top tier. Heavier tools, spare gadgets, or bulkier pieces belong lower down. For a modular kitchen, a tiered system can work well beside other organizer styles, as long as each drawer still has one clear job.
8. Moisture Control and Ventilation in Drawers
Moisture is the quiet problem that ruins a tidy drawer. Rust, mold, warping, and musty smells usually start small, then spread when drawers stay closed in humid conditions. If your kitchen gets a lot of steam from cooking or dries slowly after cleaning, ventilation has to be part of the drawer plan from the start.
Use breathable materials where you can. Bamboo or cork dividers make sense in moisture-prone spaces, and under-liners can help without sealing off the drawer completely. Silica gel packets are useful in particularly damp spots, but they need checking and replacing regularly if they are doing real work. A drawer that stays sealed with no airflow can trap moisture instead of solving it.
The biggest mistake is putting damp tools away too quickly. Wet spoons, lids, and cutters should dry fully before they go back into storage, or they will keep feeding odor and corrosion. If a drawer starts to smell stale or you spot condensation, open it more often and look at the room's overall ventilation, not just the drawer insert itself.
Moisture control works best when it is passive and consistent, not when you only think about it after damage starts.
That same approach matters in rental kitchens and coastal areas, where the room environment can work against your system. A dry, breathable setup gives the organizer a better chance of lasting. It also protects the tools inside, which is the point of the drawer in the first place. For broader storage planning, see these under-sink storage ideas, since cabinets below the counter often face the same moisture issues.
9. Accessibility-Focused Drawer Organization
A good drawer system should work for the people using it, not just for the person who set it up. That means thinking about height, reach, weight, grip, and how easy the drawer is to understand at a glance. In multigenerational households, or homes where someone has arthritis or limited mobility, those details matter more than perfect symmetry.
Keep heavy items at a comfortable reach level, not tucked low where they require bending or high where they need lifting overhead. Use large, high-contrast labels if more than one person uses the drawers. Choose handles and slides that are easy to grip and smooth to open, because stiff hardware becomes a barrier fast.
The most accessible drawers are also the simplest to maintain. Limit the number of items in each one so the contents stay light and easy to sort. If children use the kitchen, put safe, common items in reachable zones and keep sharp or fragile tools elsewhere. That kind of routing reduces friction without turning the kitchen into a museum of perfect containers.
A household command centre can make sense in one drawer, as long as the drawer is curated rather than random. Shared homes often need a small utility zone for batteries, tape, permits, chargers, or school items. That's not clutter, it's a functional category when it has rules and stays contained.
The best test is simple. If someone else in the house can use the drawer without asking where things go, the system is accessible enough. If they can't, the setup needs clearer language or a lighter load.
10. Seasonal Rotation and Intermittent-Use Item Storage
Seasonal rotation keeps drawers from filling up with items you only need part of the year. Holiday serving utensils, special baking tools, grilling accessories, and entertaining gadgets all deserve storage, but not necessarily prime drawer space all year long. Rotating them in and out keeps daily-use drawers efficient.
A seasonal system works best when the off-season items live in clearly labelled bins or secondary storage. Take photos of the drawer before you remove things, then keep a simple inventory so you remember what moved where. That makes it much easier to bring the right items back when the season changes.
Set a reminder a week or two before the transition. That gives you time to clean the drawer, reassess what you still use, and return items in a way that fits your current routines. If you didn't use a seasonal item the previous year, consider donating or gifting it instead of storing it again out of habit.
The trade-off is emotional. People keep things because they might need them someday, not because the drawer still has room. Seasonal rotation forces a clearer decision. If an item earns its place, it comes back into the drawer. If it doesn't, it stays in secondary storage or leaves the house entirely.
A stronger drawer system isn't static. It changes with the way you cook, host, and store things through the year. That flexibility is what keeps the drawers useful instead of merely tidy.
Kitchen Drawer Organization: 10-Point Comparison
| Solution | Implementation Complexity 🔄 | Resources & Cost ⚡ | Expected Outcomes 📊 | Ideal Use Cases ⭐ | Quick Tips 💡 |
|---|---|---|---|---|---|
| Drawer Dividers and Compartmentalization Systems | Low, simple install; requires measuring and configuration | Low cost ($15–$50); bamboo/plastic/wood/metal; no tools usually | Better space utilization, reduced clutter, faster item retrieval | Renters, mid-size kitchens, general utensil organization | Measure drawer interior; start with 4–6 sections; place frequent items front |
| Utensil Inserts and Custom Trays | Medium, precise measurement or custom fit; removable trays | Moderate–high ($30–$80); polypropylene, silicone-lined wood, bamboo | Protects utensil edges, highly organized layout, faster meal prep | Drawers with awkward shapes or limited depth; neat-cutlery focus | Separate knives; line with felt/silicone; remove weekly to clean |
| Vertical Drawer Organization with Upright Dividers | Medium, needs deep drawers (min ~12"); may need custom widths | Moderate cost; acrylic/metal/reinforced plastic; durable pieces | Maximizes depth, visible inventory, prevents crushing of items | Deep drawers for cutting boards, baking sheets; property managers | Measure depth; place heavy items at back; use adjustable dividers |
| Labeled Drawer Systems and Color-Coding | Low, low technical work but upfront planning/time | Very low cost; label makers, tape, laminated holders; replace periodically | Strong maintenance and compliance; easier sharing of duties | Family kitchens, rentals, hospitality, multigenerational homes | Use waterproof label makers; keep labels visible; update quarterly |
| Drawer Liners and Non-Slip Mats | Low, easy to cut/fit and apply; occasional replacement | Low cost ($10–$25 per drawer); rubber, vinyl, cork; washable | Protects drawer finish, reduces noise, prevents item sliding | Protecting drawer interiors, rentals, humid kitchens (waterproof liners) | Clean surface before applying; leave 1/4" border; replace every 6–12 months |
| Specialty Drawer Organizers for Specific Tools | Medium, must match tool sizes; single-purpose design | Higher cost ($40+); wood, silicone, stainless steel; sometimes custom | Protects expensive tools, reduces injury risk, extends tool life | Knife collections, specialty gadgets, professional/home chefs | Measure tools before buying; invest in quality; separate knives from other utensils |
| Drawer Depth Maximization and Tiered Storage | Medium, stacking needs clearance and slide capacity checks | Moderate cost; stackable plastic/wood inserts; non-slip feet | Increases usable volume (~40–60%), improves access to frequent items | Small apartments, RVs, tiny homes, compact kitchens | Start with one tier; heavy items on bottom; avoid overfilling (>80%) |
| Moisture Control and Ventilation in Drawers | Medium, combines materials and ongoing maintenance | Low–moderate cost; breathable liners, silica gel, perforation work | Prevents rust/mold, reduces odors, preserves drawer materials | Coastal/humid climates, rental properties near water | Replace desiccants regularly; use color-changing packs; allow slight ventilation |
| Accessibility-Focused Drawer Organization | Medium, may require hardware upgrades (soft-close) and ergonomic choices | Moderate cost; soft-close slides, lightweight organizers, large-label materials | Enables independent use, reduces strain, fosters inclusive kitchens | Aging-in-place homes, mobility-challenged users, multigenerational households | Install soft-close slides; place frequent items 24–48" high; use large high-contrast labels |
| Seasonal Rotation and Intermittent-Use Item Storage | Medium, needs secondary storage, inventory and discipline | Low–moderate cost; clear bins, labels, tracking systems, off-season storage | Reduces everyday clutter, simplifies seasonal prep, preserves specialty items | Entertainers, seasonal bakers, households with limited drawer space | Create rotation calendar; use clear labeled bins; photograph layouts before change |
Maintain Your Organized Oasis
Organizing kitchen drawers feels great on day one, but the true success is making the system easy to keep. The best drawer setup is the one that survives busy mornings, rushed dinners, and the occasional family member who puts things back in a hurry. That's why maintenance matters as much as the products you buy.
Start small if you need to. One drawer with a clear purpose is more useful than five drawers that all drift back into mixed storage. A weekly five-minute reset is enough for many households to catch drifting items, wipe out crumbs, and put categories back where they belong. If a drawer starts to fail, don't blame yourself first. Check whether the categories are too broad, the organizer is too small, or the drawer is trying to do too many jobs at once.
The strongest systems are practical, not perfect. Dividers work when they match the items you own. Labels work when everyone can read them. Liners work when they're clean and dry. Tiered storage works when the drawer can still be opened without digging. Seasonal rotation works when you send off-season items out of the prime zone instead of letting them crowd daily tools.
If you're building a broader home system, GrifGlo groups practical kitchen and organization essentials into clearer categories so it's easier to compare options without wading through noise. That kind of decision-friendly setup can help when you're choosing drawer inserts, storage tools, or other everyday organizers that need to fit real routines.
If you're ready to turn one messy drawer into a system that holds up, start with the most overloaded zone in your kitchen and build from there. Visit GrifGlo for practical kitchen and organization essentials, then choose the drawer tools that match your space, your habits, and your storage limits.

Leave a comment
This site is protected by hCaptcha and the hCaptcha Privacy Policy and Terms of Service apply.