

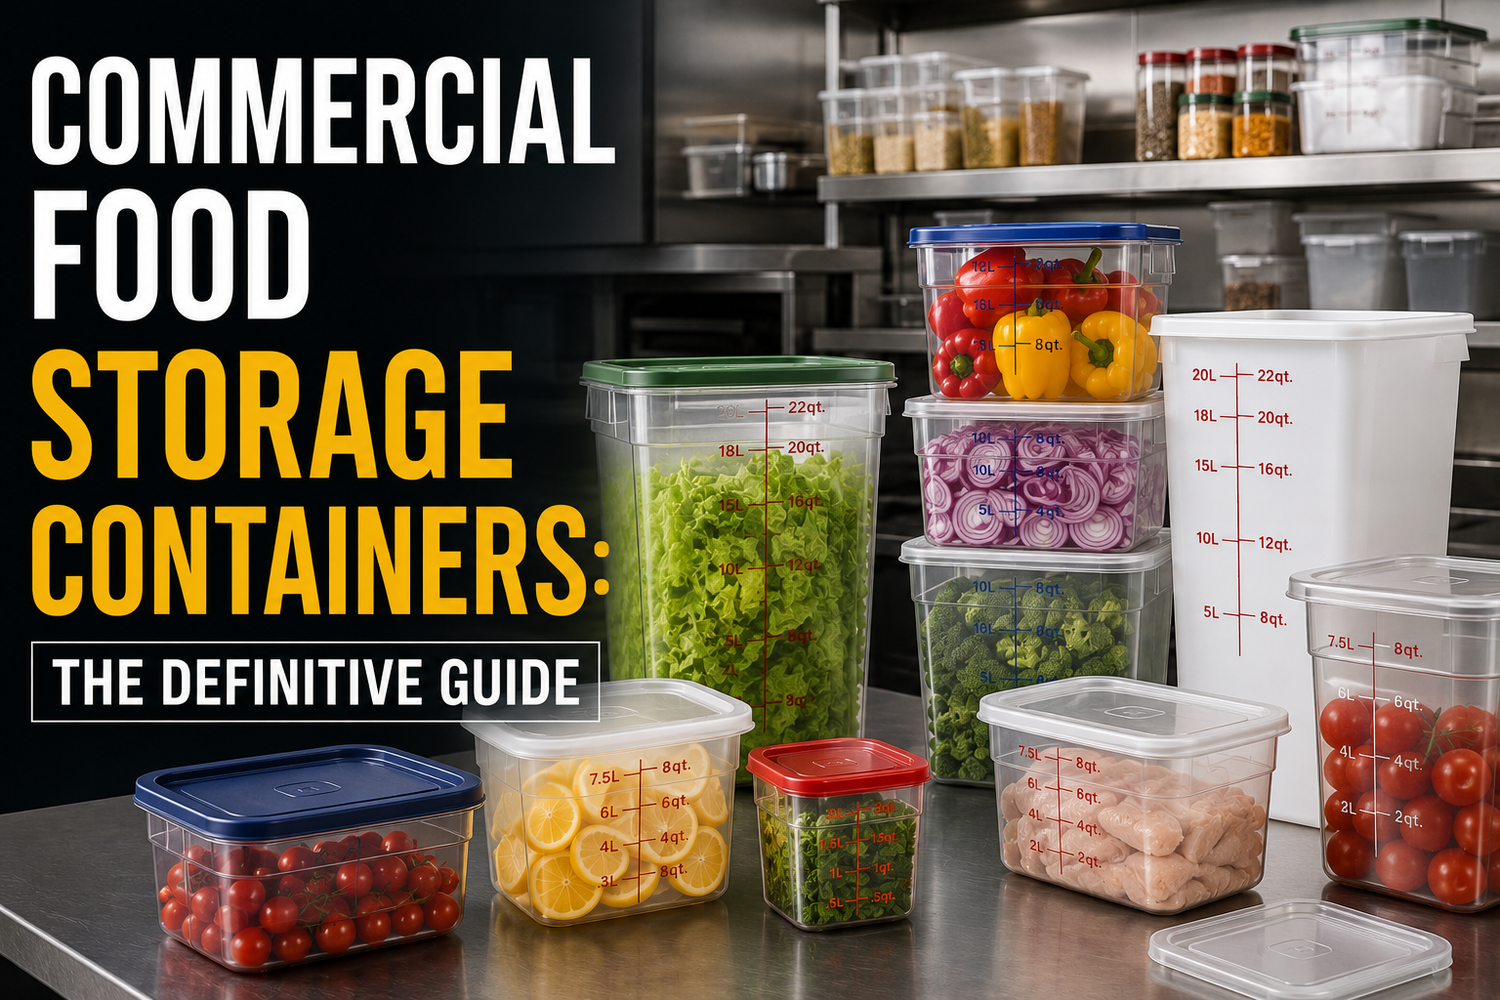
You're probably dealing with one of two situations right now. Either you're opening a kitchen and trying to decide what to buy before the invoices pile up, or you already have a kitchen and you're tired of lost lids, stained bins, mystery labels, and staff digging through the walk-in like they're on a scavenger hunt.
That's usually when operators realise commercial food storage containers aren't a minor supply line. They affect food cost, labour, shelf use, sanitation, and inspection risk every single day. Buy the wrong system and you'll pay for it repeatedly in breakage, slower prep, spoiled product, and avoidable reordering. Buy the right system and the kitchen gets faster, cleaner, and easier to manage.
The market size tells you this isn't a side issue. The global commercial food storage container market was valued at USD 170.1 billion in 2025 and is projected to reach USD 266.6 billion by 2035, while plastic holds 47.9% of the commercial segment in 2025, according to Global Market Insights on the food storage container market. Those numbers matter less than what they point to. Kitchens depend on these systems because they're part of the operating model, not just the shelf setup.
Table of Contents
- Why Your Food Storage System Is a Critical Asset
- Choosing the Right Material for the Job
- Mastering Kitchen Space with Smart Sizing
- Navigating Food Safety and Compliance
- The A-to-Z of Daily Food Storage Workflow
- Protecting Your Investment Cleaning and Maintenance
- Strategic Sourcing for Your Business
Why Your Food Storage System Is a Critical Asset
Disorganised walk-ins and mismatched lids are not minor annoyances. They drain labour, hide inventory, and push food cost up a little at a time until the numbers start showing up in prep sheets and waste logs.
A disorganised walk-in tells you a lot about how the rest of the kitchen runs. Sauce split between odd containers. Herbs crammed into deep bins that shorten their usable life. Raw prep parked on the wrong shelf because the right container or lid is missing. During service, that turns into delays, duplicate prep, cross-use mistakes, and product that gets forgotten until it has to be thrown out.
I've seen new kitchens spend freely on containers and still end up with a bad system. The usual problem is not quantity. It is a pile of mixed shapes, mixed lid types, and no standard for where anything lives or how it is labelled. That setup costs money every day because staff spend extra touches finding product, checking dates, restacking shelves, and remaking items that were already in the building.

A good storage system protects product, reduces handling time, and supports clean inspections. In practical terms, containers belong in the same planning conversation as shelving, refrigeration, and prep tables. They affect how quickly the team can receive stock, rotate ingredients, read what is on hand, and keep raw and ready-to-eat items separated.
Practical rule: If a cook has to open three containers to find one ingredient, the system is costing you labour.
Upfront price matters, but total cost of ownership matters more. A cheaper container that stains, cracks, warps in the wash, or loses its lid standard early is expensive in operation. It creates replacement spend, slows cleaning, increases handling errors, and makes stock harder to track. A standardised system lasts longer, cuts wasted motion, and gives managers a clearer read on inventory before they place the next order.
Material choice also affects operating cost, which is why it helps to compare glass vs plastic food storage containers for commercial use in terms of breakage risk, visibility, cleaning routine, and replacement cycle, not just purchase price.
The scale of this category reflects its operational importance across foodservice. In a working kitchen, the return shows up in fewer lost ingredients, faster line checks, cleaner storage zones, and fewer compliance problems tied to labelling, segregation, and shelf organisation.
Choosing the Right Material for the Job
A new kitchen opens with a full rack of matching containers, and six weeks later the team is already working around them. Lids have gone missing, tomato base has stained half the set, cooks cannot see stock at a glance, and replacement orders start showing up before the first monthly inventory review. That is a material selection problem, not a staff problem.
The right material depends on product type, handling, wash routine, and how fast the team needs to identify contents. Kitchens that buy one material for every task usually pay for it later in breakage, relabelling, slower line checks, and avoidable replacement spend.

Match the material to the food and the station
Stainless steel suits heavy prep, proteins, chilled mise en place, and back-of-house storage where containers take abuse. It lasts, resists odour pickup, and handles repeated washing well. The trade-off is simple. Staff cannot read contents or fill level without a label and a lid check, so steel works best where product changes less often or labelling discipline is tight.
Polycarbonate earns its keep where visibility saves labour. Clear walls let cooks confirm stock level, colour, and separation without opening the lid, which speeds up line setup and station checks. It usually costs more than softer plastics, so it makes sense where that visibility cuts enough handling to justify the higher purchase price.
Polypropylene is a practical general-use option for prep, cold holding, and backup stock. It gives operators broad coverage without pushing capital cost too high. It is less about presentation and more about steady daily use, especially in kitchens that need a standard system across multiple stations.
HDPE is a sensible choice for bulk ingredients, dry storage, and routine back-of-house use where low replacement cost matters. It is lightweight and serviceable. The usual compromise is lower clarity and a less polished fit for items staff need to identify fast during service.
Glass gets plenty of attention, but many commercial kitchens do not get a good return from it. Weight slows handling. Breakage raises safety risk and cleanup time. In most operations, the total cost climbs once you account for labour, breakage protocol, and replacement. A side-by-side look at glass vs plastic food storage containers for commercial use helps frame those trade-offs.
Where each material earns its keep
Buy material by task, not by catalogue category.
Use stainless for hard-use prep and storage where longevity matters more than visibility. Use clear rigid plastic where fast visual checks reduce opening, handling, and line delay. Use lower-cost plastics for bulk storage and backup inventory where the main goal is coverage without burning cash on premium specs no one uses.
This decision shows up in prep flow too. If your team is running a Hamilton Beach 10 Cup Stainless Steel Food Processor - 70730C for chopped vegetables, herb mixes, or sauce bases, output needs to land in the right container immediately. The machine can speed prep. The gain disappears if product then goes into containers that stain, stack poorly, or force staff to stop and relabel because nothing is visible.
A mixed-material system usually performs better than a single-material system. That does not mean buying every option on the market. It means assigning each material a clear job so containers last longer, product is easier to track, and replacement spend stays predictable.
Choose materials based on abuse level, visibility needs, and wash-cycle tolerance. That is how containers reduce labour and food loss instead of adding another hidden operating cost.
Container Material Comparison
| Material | Temperature Range | Clarity | Stain Resistance | Best For |
|---|---|---|---|---|
| Stainless steel | Broad commercial use across cold prep and storage | Opaque | Strong in everyday use | Heavy-use prep, proteins, back-of-house handling |
| Polycarbonate | Suited to cold storage and many prep applications | Clear | Generally good for visible ingredient storage | Sauces, cut veg, items staff need to identify fast |
| Polypropylene | General-purpose kitchen use | Translucent | Varies by product and use | Everyday storage where flexibility and lower cost matter |
| HDPE | Strong fit for routine cold and dry storage | Usually translucent or opaque | Good for many bulk applications | Dry goods, bulk ingredients, cost-conscious standardisation |
Mastering Kitchen Space with Smart Sizing
A new kitchen can look fully equipped on paper and still bleed time every service because the container system was sized by guesswork. Half-full bins eat shelf space, tiny backups multiply lids and labels, and staff keep repotting product just to make it fit the next station. That is labour cost, food cost, and avoidable frustration.
Smart sizing starts with flow. The right container size should match how much product the station uses, how often it gets replenished, and where it sits between receiving, prep, line, and backup storage. If a sauce gets made every morning and finished by dinner, it needs a different container than a case-lot backup item that only gets touched twice a week.

Start with the menu, not the catalogue
Before ordering containers, audit the menu and the room. I look for four things first. What gets used every shift, what gets prepped in batches, what needs backup stock, and what physically fits the shelving you already have.
A practical sizing plan usually follows this sequence:
- List ingredients by station and batch size so container capacity reflects real production.
- Separate active stock from backup stock so line cooks are not digging through reserve inventory during service.
- Measure shelves, reach-ins, lowboys, and walk-ins so container height and footprint fit the space cleanly.
- Limit the system to a small group of repeat sizes so lids, stacks, and reorder patterns stay manageable.
- Match each size to a job such as line-ready prep, one-day prep, two-day backup, or bulk dry storage.
Kitchens save money when the crew can recognize the system at a glance. Fewer footprints mean faster put-away, simpler par levels, and lower replacement spend. For a practical sizing reference, see food storage container sizes.
Build for access, cleaning, and real production volume
Space efficiency is only useful if the setup still works during a rush. Containers need to come off the shelf without collapsing a stack, and staff need room to wipe shelves, rotate stock, and spot old product fast.
Bottom shelves and bulk storage need enough clearance for cleaning and safe storage, as noted earlier. Plan that clearance before you choose tall bins or deep tubs. If you fill every vertical inch with product, the shelf may look full, but the system gets slower to clean and harder to maintain.
The layout that holds up best in daily use is simple:
- Fast movers at hand level to cut bending, reaching, and searching during service.
- Heavy or dense containers low to reduce lifting risk and spills.
- Backup stock grouped by category and size so receiving can put product away quickly and correctly.
- Standard footprints across shelves so stacks stay stable and open space stays usable.
One more trade-off matters. Larger containers often lower unit cost, but they also increase exposure if product gets over-prepped, mishandled, or held too long. Smaller containers can raise dish volume, yet they often improve rotation and reduce waste on expensive items. Good sizing balances those costs instead of chasing the cheapest bin.
The best setup lets staff store product once, find it fast, rotate it correctly, and clean the area without tearing the shelf apart. That is what turns containers from a supply purchase into an operating system.
Navigating Food Safety and Compliance
A container isn't compliant because it looks professional. It's compliant because it meets the standard, suits the food, and supports a cleaning routine staff can execute.
In California, commercial food storage containers must be NSF-certified to NSF Protocol P386 or equivalent standards, and leftovers requiring cold storage must be refrigerated within 2 hours of serving, according to NSF's guidance on food storage containers. Those two points matter because they connect the container itself to the way food moves through the kitchen.

What certification actually changes in daily use
NSF certification isn't decorative. It tells you the container has been independently assessed for food-safe materials and cleanability. That matters most in busy kitchens where containers cycle through raw product, prep ingredients, leftovers, and repeated washing.
If a surface scratches too easily, traps residue in corners, or clouds in a way that hides buildup, cleaning quality drops. Staff may still wash it. They just won't restore it fully.
That's why certification should be part of procurement, not an afterthought. It also needs to connect to your cleaning tools and SOPs. A kitchen can have compliant containers and still fail in practice if brushes, sanitisers, drying racks, and wash routines aren't set up properly. For the supply side of that equation, commercial cleaning supplies can help frame what needs to sit behind the storage system.
Compliance shows up in ordinary habits
Food safety problems usually come from ordinary shortcuts. Hot food goes into one deep bucket instead of smaller containers. Leftovers sit out too long because the shift got busy. Staff stack damp containers before they've air-dried. Labels go missing. The container might be acceptable, but the workflow around it isn't.
What works is a repeatable chain of handling:
- Cool food properly by portioning large hot quantities into smaller containers before refrigeration.
- Use vented lids initially for hot foods when needed during the cooling stage, then seal appropriately once temperature and condensation are under control.
- Separate raw and ready-to-eat storage with a physical plan, not just staff memory.
- Wash between every use rather than treating “same ingredient family” as good enough.
California operations also deal with close inspection pressure in high-density food environments. That means compliance has to be obvious on the shelf. Labelled. Raised. Clean. Organised. Easy to verify.
If your container system depends on everyone remembering exceptions, it isn't a good system.
The strongest kitchens reduce judgement calls. They choose compliant containers, assign them by use, and build habits around cooling, storing, cleaning, and rotation. That's what keeps the inspector satisfied and the product safe.
The A-to-Z of Daily Food Storage Workflow
The value of commercial food storage containers shows up in the handoff moments. Receiving to prep. Prep to service. Service to leftover storage. Cleaning to re-use. If those handoffs are clumsy, the kitchen feels slow even when the team is working hard.
From receiving to storage
Start with a simple rule. Product should enter the building and move into its proper container only when that transfer improves control. If supplier packaging is damaged, oversized, messy, or poor for shelf use, re-pack immediately. If the original packaging is intact and already workable for short-term use, don't create extra labour just for appearance.
A disciplined daily flow looks like this:
- Receive and inspect the product.
- Assign the storage location before it lands on any shelf.
- Transfer to the right container if the original package won't support hygiene, stacking, or portion access.
- Label before shelving, not later.
- Place newer stock behind older stock so FIFO happens physically, not theoretically.
FIFO fails when staff have to stop and think. Build it into shelf direction, not training slides.
What a workable label system looks like
The best label is the one tired staff can still read and apply correctly. Keep it direct.
Your label should include:
- Item name
- Prep or open date
- Use-by date
- Staff initials or station identifier, if that helps internal accountability
You can add batch notes or allergen cues where useful, but don't overcrowd the label. If every label turns into a form, staff will skip parts of it.
A few habits make labels usable:
- Put labels in the same spot on every container type.
- Use container sizes that leave room for labels without wrapping around corners.
- Remove old adhesive and ghost marks so the current label is the only one visible.
Stacking that helps instead of hurting
Stacking is where speed and safety meet. Good stacks save shelf space. Bad stacks crush product, block airflow, and turn one retrieval into a mini reorganisation project.
Use these rules on every shift:
- Heavy on the bottom: Dense sauces, proteins, and bulk preps should anchor the shelf.
- Frequently used items in front: Don't bury line staples behind backup inventory.
- Leave handling room: If a cook has to drag one box over another to remove it, the shelf is too tight.
- Protect delicate items: Herbs, cut fruit, and fragile garnishes should never sit under weight.
I prefer a system where each shelf has an obvious role. One shelf for line-ready product. One for backup. One for cooling. One for raw prep. Once staff can predict where something lives, search time drops and unnecessary opening of containers drops with it.
The payoff isn't glamorous. It's fewer interruptions, faster pick-up, and less food forgotten in the back corner.
Protecting Your Investment Cleaning and Maintenance
A new container system can look fine on day one and still become expensive fast. The losses show up later. Extra scrubbing at dish. More replacement orders. Product tossed because a lid no longer seals or a scratched interior cannot be trusted. Cleaning and maintenance decide how long that system earns its keep.
Treat container care as part of cost control. A container that takes two extra minutes to wash, dry, inspect, and match with the right lid is not cheap in a busy kitchen.
Clean for repeat use, not for appearance
The standard is simple. Containers need to come back into service safe, dry, odour-free, and ready to stack without slowing the next shift. Certified food storage containers usually make that easier because smooth surfaces, stable shapes, and clear use markings reduce guesswork at the sink and in the dish machine.
Set a cleaning routine staff can follow the same way every time:
- Pre-rinse fast: Sauces, starches, dairy, and proteins get harder to remove once they dry.
- Wash fully between uses: Residue left behind shortens container life and raises cross-contact risk.
- Follow the use marking: Heat tolerance and dishwasher suitability vary by material and product line.
- Air-dry completely before nesting: Trapped moisture leads to odour, slows service, and can undo good washing.
For a practical breakdown of routine care steps, how to clean food storage containers gives a useful plain-language reference.
Drying matters more than many teams realize. Wet nested containers force staff to stop and rewash, wipe, or sort through a stack during prep. That is wasted labour before the first ticket prints.
Retire containers on performance, not on age
A worn container does not need to be broken to cost you money. Once it stops being easy to clean, easy to inspect, or reliable in storage, it starts dragging on the operation.
Pull a container from service when you see:
- Cracks or chips that hold soil or spread under heat and washing
- Deep scratches in the food contact surface
- Clouding or chemical haze that makes visual inspection difficult
- Warped rims or lids that prevent tight closure or stable stacking
- Persistent odours after proper washing and drying
I tell teams to check the failure points that get missed. Corners. Lid channels. Base edges. The underside of the lip. Those spots decide whether a container stays in service or starts creating risk.
Good maintenance reduces replacement spend, protects product, and keeps dish and prep moving at the right pace. That is the ultimate return.
Strategic Sourcing for Your Business
Procurement teams often ask the wrong opening question. They ask, “What's the unit cost?” The better question is, “What will this system cost us to own, clean, replace, store, and manage over time?”
That's the total cost of ownership view. It's the only one that makes sense in a working kitchen.
Cheap containers often cost more
A low purchase price can still be expensive if the containers stain fast, crack early, use three different lid patterns, or waste shelf space. You'll feel that in replacement orders, prep delays, and product loss. You'll also feel it in training. Mixed systems force staff to remember exceptions instead of following one standard.
The strongest purchasing decisions usually share a few traits:
- They standardise footprints so shelves stay organised.
- They reduce lid variation because missing-fit problems waste time every day.
- They match material to use case instead of buying one cheap option for all tasks.
- They account for compliance before the order is placed.
That last point matters more in California than many operators expect. Packaging Law's discussion of food storage container regulation notes a state-specific divergence where California weights and measures rules can override federal Fair Packaging and Labeling Act requirements for container capacity markings, which creates confusion for cottage food operators storing bulk inventory in 5-gallon buckets. If you handle bulk storage for resale or related use cases, don't assume a national rule of thumb covers your operation.
What to ask suppliers before you standardise
Don't buy into a system until you've asked practical questions.
- Is certification documented clearly? If it's vague in the listing, treat that as a warning.
- How many lid families are in this range? Fewer is better for operations.
- Can staff identify the intended use quickly? Material clarity and shape matter here.
- Will replacements be easy to source later? A system only works if you can maintain it.
This is also where a platform like wholesale kitchen supplies can be useful as a planning aid. It helps buyers think through structured purchasing rather than one-off item hunting.
One system beats a mixed pile
Standardising doesn't mean using one exact container for every product. It means building one coherent system with a limited number of materials, footprints, and lid formats.
That saves labour in quiet ways. Staff shelve faster. Receiving errors drop. Washing and drying are easier to stage. Managers can scan stock levels without decoding five different container lines. The kitchen looks calmer because it is calmer.
A good buyer doesn't chase the cheapest box. A good buyer reduces friction across the whole life of the container.
GrifGlo can help if you're comparing kitchen essentials, planning a more structured purchasing approach, or narrowing down options before a larger order. It publishes decision-focused guides across kitchen, organisation, and business purchasing categories, including practical comparisons and sizing advice, at GrifGlo.

Laisser un commentaire
Ce site est protégé par hCaptcha, et la Politique de confidentialité et les Conditions de service de hCaptcha s’appliquent.