

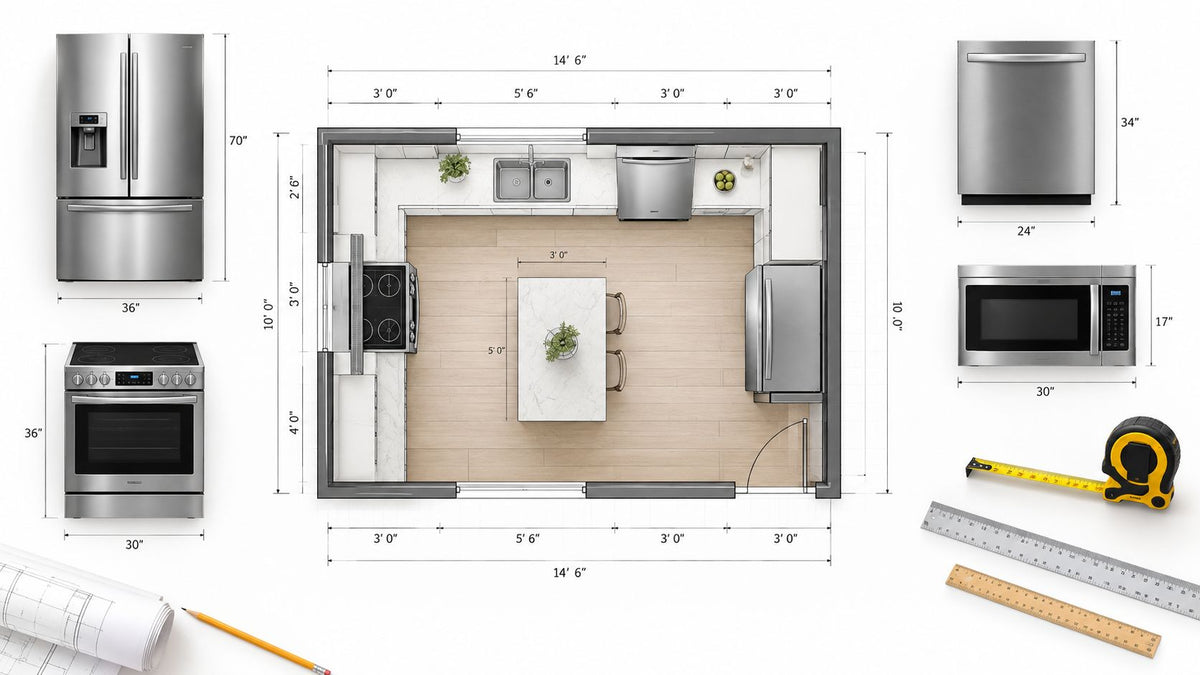
A full-size refrigerator opening is commonly about 36 inches wide by 70 to 72 inches high, while a standard dishwasher opening is about 24 inches wide by 34½ inches high. Those figures are starting points, not complete installation dimensions, because doors, handles, ventilation, rough openings, and regional clearance rules all affect the fit.
You've measured the cabinet opening, found an appliance that looks like it should fit, and placed the order. Then the delivery crew discovers the refrigerator can't clear the hallway turn, or the range door hits a nearby cabinet before it opens fully. These failures are rarely caused by the advertised width alone. They happen because kitchen appliance dimensions describe an installed envelope, not merely the metal box shown on a product page.
The practical approach is simple: measure the room, opening, delivery path, swing zones, utilities, and required clearances before selecting a model. You also need to check whether the appliance's capacity and type satisfy a local rebate programme. A product that fits the cabinetry but misses an incentive threshold may still be the wrong purchase.
Table of Contents
- Understanding Why Appliance Dimensions Matter
- Standard Refrigerator Dimensions and Clearances
- Range and Cooktop Dimension Standards
- Dishwasher and Built-in Appliance Sizing
- Microwave and Small Appliance Measurement Tips
- Essential Clearance Rules and Safety Standards
- Quick Reference Dimension Chart
- Planning Your Kitchen Layout with Dimensions
Understanding Why Appliance Dimensions Matter
A refrigerator can fit between two cabinets and still fail in daily use. The door may strike a wall, the crisper drawers may not pull out, or the handles may project into the circulation path. A range can slide into its opening while leaving too little room above the cooking surface or preventing the oven door from opening without blocking the aisle.
The first measurement is the rough opening, not the appliance label. Record the opening's narrowest width, floor-to-cabinet height, depth to the wall, and any irregularity in the floor or surrounding panels. Measure at more than one point because older cabinetry and remodelled walls are rarely perfectly square.
Measure the complete installation envelope
The manufacturer's overall dimensions usually tell you the appliance's external size in a defined configuration. They may not show every condition that matters on site. Your planning notes should include:
- Face dimension: Width and height of the visible appliance body.
- Projection: Depth including handles, control panels, doors, and trim.
- Operating clearance: Space needed for doors, drawers, racks, and pull-out components.
- Service space: Room for cord routing, water connections, ventilation, and future repairs.
- Transport path: Doorways, hallways, turns, stairs, and the final approach to the kitchen.
The difference between nominal and actual dimensions is especially important with built-in appliances. A wall oven's visible front can be larger than its required cutout, while the reverse can happen with a handle or hinge that extends beyond the cabinet line.
Practical rule: Never approve an appliance from the product listing alone. Download the exact installation sheet and compare every dimension with the measured opening.
Door swing deserves its own drawing. Mark the hinge side, open the door through its intended arc, and show where an adjacent wall, island, pantry, or handle interrupts movement. For dishwashers, draw the lowered door because it occupies floor space and can obstruct the person loading it.
A useful buying reference is this kitchen appliance buying guide, but the final authority remains the model-specific installation documentation. Product guides can help you compare categories, while the installation sheet tells you whether a particular unit works in your room.
Measure before cabinets are ordered whenever possible. That sequence gives you time to alter an end panel, shift a water line, or choose a counter-depth model instead of forcing an expensive correction after the countertop is installed.
Standard Refrigerator Dimensions and Clearances
A refrigerator can fit its cabinet opening and still fail at the doorway, island, or adjacent wall. Labels such as “36-inch fridge” describe a nominal category, not the complete installed envelope. A narrow top-freezer, counter-depth French door, and built-in model may require very different space even when their cabinet openings look similar.
Canadian renovation planning often allows a full-size refrigerator opening of about 36 inches wide by 70 to 72 inches high. Built-in units may use cutouts that differ substantially from their visible fronts. Separate the overall appliance size, rough opening, and finished panel dimensions before cabinets are ordered. The Canadian appliance fit guidance can help establish the planning terms, but the selected model's installation sheet controls the final fit.
| Type | Width | Depth | Height |
|---|---|---|---|
| Compact or apartment refrigerator | About 24 inches | Shallow to standard depth | Varies by model |
| Mid-size refrigerator | About 30 to 33 inches | Counter-depth or standard depth | Varies by model |
| Full-size French door or side-by-side | About 36 inches | Counter-depth or standard depth | About 70 to 72 inches for common openings |
| Built-in refrigerator | Opening-specific | Cabinet-integrated | Opening-specific |
Counter-depth, standard-depth, and built-in choices
A counter-depth refrigerator usually projects less into the room and aligns more cleanly with surrounding cabinets. Its body depth does not account for every projection. Door thickness, hinges, handles, and the swing arc still need to be checked.
Standard-depth models generally provide more interior capacity, but their projection can narrow an aisle or conflict with an island. Built-in refrigerators demand tighter coordination because ventilation, cabinet panels, finished sides, and manufacturer tolerances form part of the installation. Regional rebate programs may also distinguish between qualifying models or configurations, so verify eligibility before treating a particular size as interchangeable with another.
Measure the opening at the front, centre, and back, then use the smallest result. Measure from the finished floor to the underside of the cabinet or bulkhead, not only to the ceiling. Check floor level, cabinet alignment, and whether the unit must be tipped during delivery.
Plan the door and delivery path
Record body depth, depth with doors, depth with handles, and depth with doors open. Confirm that shelves and drawers can be removed for cleaning, and that the doors open far enough for those parts to come out.
Before ordering, measure the narrowest doorway and hallway turn on the delivery route. Compare those dimensions with the refrigerator's depth and width when doors are removed, as specified on the installation sheet. Include stairs, tight corners, and the final approach to the opening. A unit that fits the finished kitchen can still be rejected at delivery if the route cannot accommodate it.
For wider refrigeration, consult this guide to a 36-inch fridge. Use it to compare the category, then verify the chosen model's installation diagram, swing requirements, utility locations, and any local incentive conditions.
Range and Cooktop Dimension Standards
A range can fit the cabinet opening and still fail at installation. The visible width is only one part of the decision. Cabinet depth, countertop edges, ventilation, supporting structure, combustible-surface clearances, and regional code requirements all affect the final fit. Rebate eligibility may also depend on the appliance model or configuration, so check the local program before treating similarly sized units as interchangeable.
A 30-inch range is a common planning reference, while wider appliances are available in 36-inch configurations. These labels describe nominal width, not the complete installation envelope. Side edges, control panels, handles, doors, and required clearances may extend beyond the cabinet faces.
Freestanding versus slide-in ranges
Freestanding ranges usually have finished sides and a rear control or backsplash area. They are practical replacements because the cabinetry opening needs less visual integration than a slide-in installation. Their body may project beyond the base cabinets, and the rear profile can affect backsplash depth, receptacle placement, and gas or electrical access.
Slide-in and slab-style ranges create a more integrated appearance. Front controls and an overlapping cooktop edge reduce the exposed gap beside the appliance, but the countertop opening must be more exact. Measure the opening at several points, check the floor for level, and confirm the finished side clearances. A small error can leave an uneven reveal or prevent the range from sitting securely.
A built-in cooktop requires a different measurement approach. Its advertised width is a category, while the countertop cutout is model-specific. Confirm the cutout length, width, corner radius, worktop thickness, support rails, connection route, and ventilation method. Gas and electrical work may also require locally compliant installation.
Wall ovens require cutout measurements
Wall ovens commonly expose the difference between appliance size and cabinet opening. One Thermador single wall oven example measures 19 5/8 inches high by 29 3/4 inches wide by 22 3/8 inches deep, while its standard-install cutout measures 19 1/4 inches by 28 1/2 inches by 22 inches. Treat those figures as model-specific, not as a universal wall-oven standard.
Use the manufacturer's cutout diagram, confirm the finished floor height, and check how far the door projects into the walkway. Also verify the required cabinet ventilation and electrical connection details. The 36-inch kitchen range guide can help compare range categories, but the selected model's installation instructions control the actual opening.
Before ordering, confirm whether the appliance qualifies for available regional rebates and whether the planned gas, electrical, and ventilation arrangement meets local code. A dimension that fits physically may still require a different configuration to pass inspection or qualify for an incentive.
Dishwasher and Built-in Appliance Sizing
A dishwasher can fit the cabinet opening and still fail in daily use. The opening must allow for levelling feet, supply and drain connections, insulation, door thickness, the countertop underside, and later servicing. Confirm the selected model's installation sheet before finalizing the cabinet, because dimensions and connection locations vary by appliance.
A standard built-in unit is commonly planned around 24 inches wide by 34½ inches high, with depth coordinated to the base cabinets. An 18-inch compact dishwasher suits a smaller kitchen, suite, or secondary space, but reduces loading capacity and changes the cabinet layout. Compare the planning constraints in this guide to a compact dishwasher in Canada before choosing the opening.
Drawer-style models require clearance for each drawer's travel. A thick countertop edge, projecting cabinet rail, or adjacent corner can interfere with the upper drawer. Panel-ready models add another concern: the custom front increases door weight, affects balance, and must align with nearby drawer fronts. Confirm panel thickness and the manufacturer's weight limit rather than assuming any cabinet door will work.
Measure the opening, not the old machine
Remove the existing trim, or inspect behind the toe kick where access allows. Measure clear width at the top, middle, and floor. Record height at both sides, since an uneven floor can leave one end too short. Check the opening depth all the way to the rear wall, including space needed for the water line, drain hose, and electrical connection.
Check the countertop thickness and underside before ordering. The finished dishwasher height must leave enough room for levelling while keeping the control panel and door aligned with the surrounding cabinetry. A panel-ready front also needs accurate alignment with adjacent drawer fronts.
The door needs a clear landing zone. Open it fully and confirm that the lowered door will not trap someone between the appliance and an island. Racks must extend without hitting a corner cabinet or obstructing the walkway.
Installation check: A dishwasher that fits the opening but cannot be levelled, serviced, or opened comfortably is not a successful fit.
Set the drain loop, water connection, and electrical location according to the selected installation instructions and local requirements. Keep connections from blocking the appliance as it slides into place. Before committing to the cabinet, check whether the model qualifies for available regional rebates and whether its electrical, plumbing, and installation arrangement meets local code. Physical fit alone does not guarantee approval or incentive eligibility.
Microwave and Small Appliance Measurement Tips
Microwaves often get chosen after the cabinets have been designed, even though their vents, doors, and mounting hardware can determine whether the installation works. A countertop model may fit on paper but consume the only usable prep area, while an over-the-range unit can interfere with cabinet height, hood performance, or access to the cooking surface.
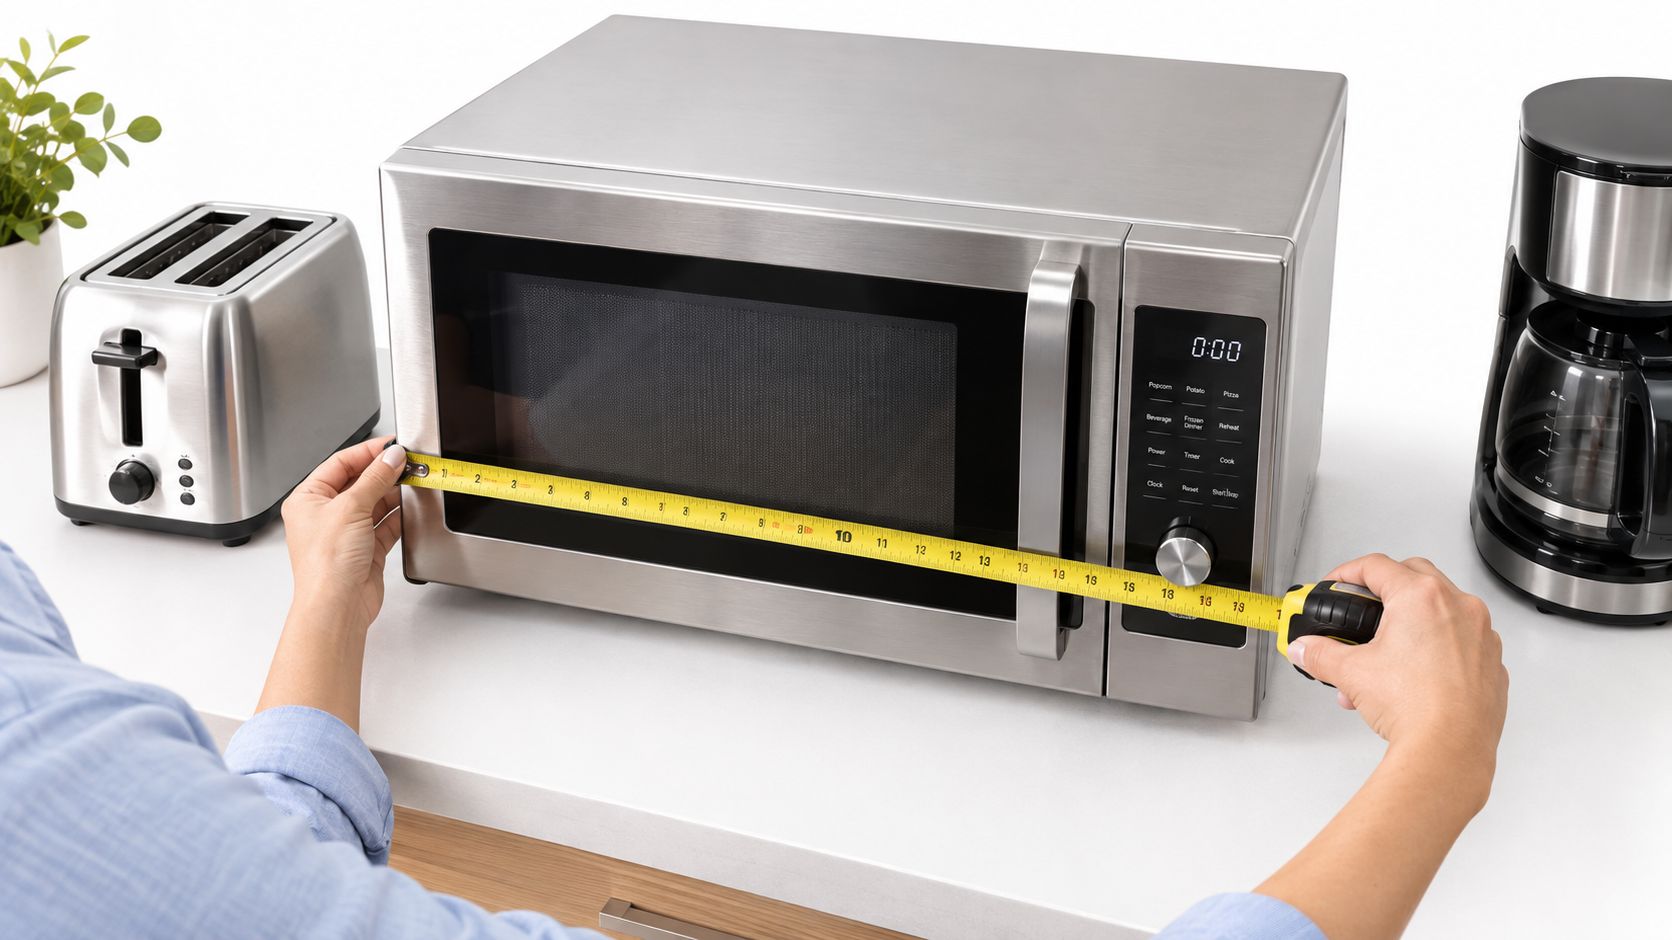
Start by separating countertop space from airflow space. Measure the microwave body, then include the rear and upper areas required by the manufacturer. Don't push a vented appliance tightly against a wall or cabinet side because its front face clears the opening.
Built-in and over-the-range planning
For a built-in microwave, measure the cabinet opening's width, height, and depth, including any trim kit. The trim can be part of the finished installation and may have its own clearance requirements. An over-the-range model also needs a mounting height that works for the cooktop and the people using it, so cabinet elevation and ventilation must be coordinated.
Before choosing a location, mark the door swing on the counter or wall. A left-hinged microwave beside a tall cabinet may be awkward even when the dimensions are correct. The same applies to a compact oven or air fryer placed beside a corner, where the open door can block the work surface.
The over-the-range microwave guide is useful for comparing installation styles. For countertop appliances, measure the space they occupy while in use, not just when stored. Coffee makers need room above for reservoirs and lids, food processors need bowl and feed-tube access, and air fryers need a safe location that doesn't trap heat beneath cabinets.
Use masking tape to outline the appliance footprint on the counter. Then place a mixing bowl, cutting board, or everyday container beside it. If the layout leaves no practical prep zone, the appliance may technically fit but still make the kitchen frustrating to use.
Essential Clearance Rules and Safety Standards
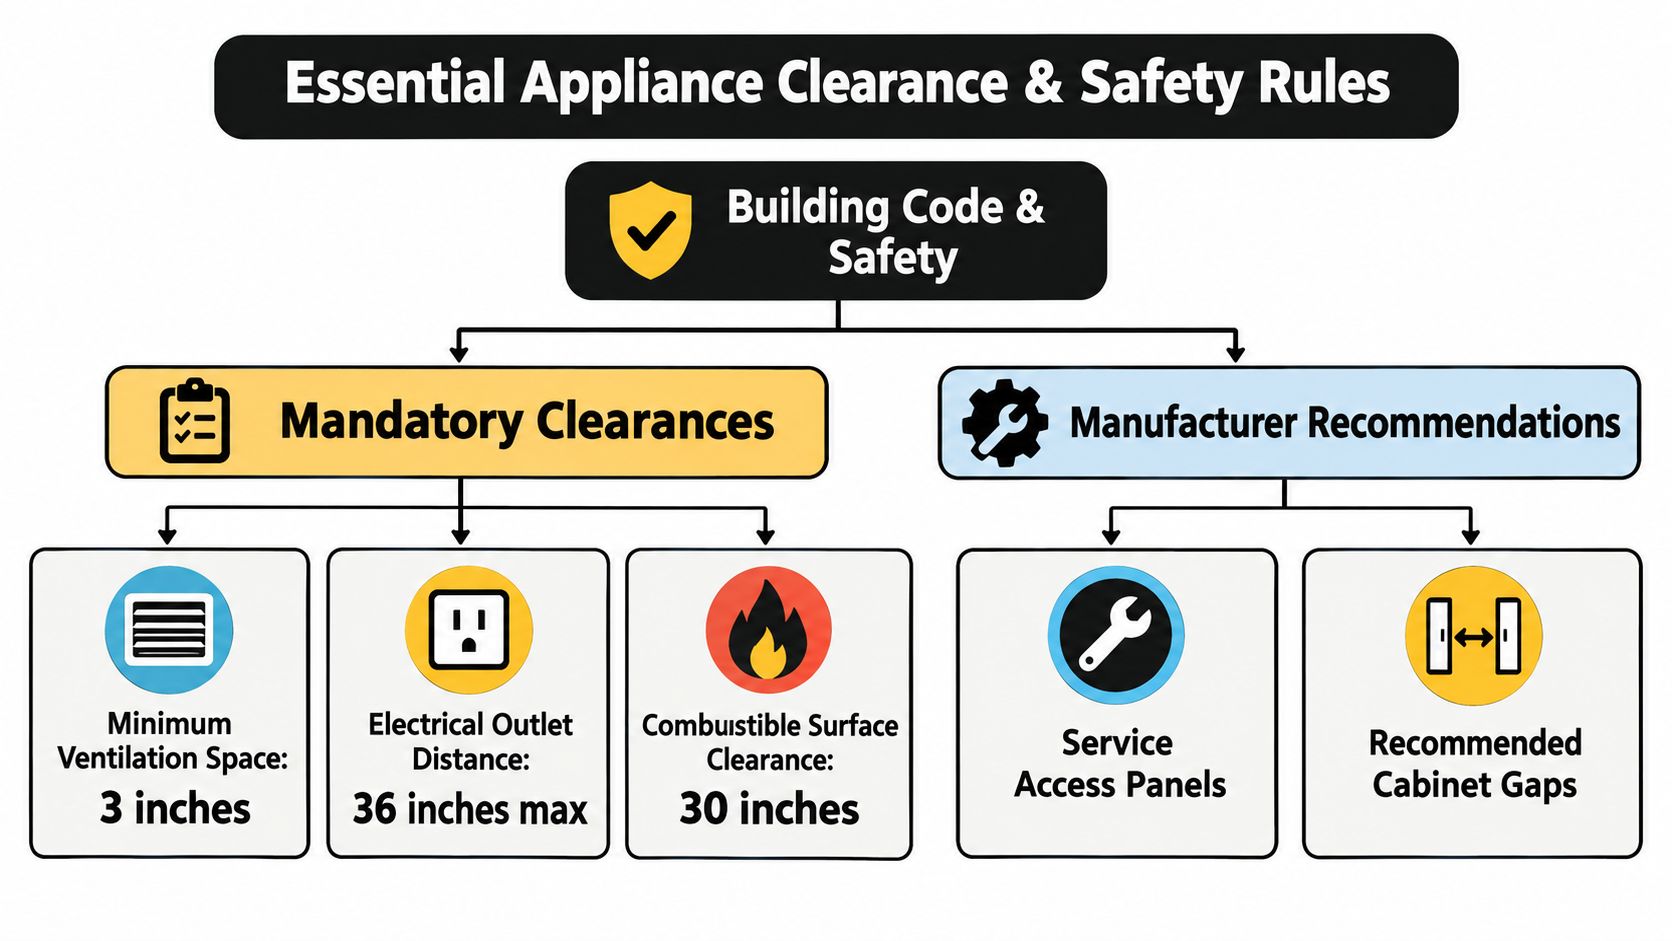
Appliance dimensions only work when checked against building-code requirements, accessibility rules, and manufacturer instructions. Use the strictest applicable requirement. A manual may specify ventilation gaps, while local code may require more room for circulation, approach, or safe operation. That distinction can affect both installation approval and eligibility for region-specific appliance rebates, which may require compliant placement and installation.
California kitchen access rules call for a clear passageway of at least 3 feet, or 914 mm, between counter fronts and appliances or walls, plus clear floor space of 30 inches by 48 inches, or 762 mm by 1219 mm, at each kitchen appliance, according to the California kitchen access requirements. In a U-shaped kitchen, the minimum clear width is 60 inches, or 1524 mm, when the appliance at the base is approached in parallel, or 48 inches, or 1219 mm, where the layout allows a forward approach. Measure these zones with doors, drawers, and handles fully open.
Cooking clearances are installation dimensions
California's Mechanical Code uses a default vertical clearance of 30 inches, or 762 mm, above cooking tops to combustible materials or metal cabinets. A reduced clearance of 24 inches, or 610 mm, is permitted only when protective measures are used, as detailed in the California cooking-appliance clearance provisions.
Commercial-style cooking equipment in food service requires a 48-inch, or 1219 mm, vertical distance above hot plates and griddles to combustible material. Listed counter appliances such as coffee brewers and warmers generally require at least 6 inches, or 152 mm, of horizontal clearance from combustible material under the same code reference. These measurements affect cabinet height, hood design, wall finishes, and the placement of countertop equipment. Check the appliance listing and installation manual before treating a cabinet layout as final.
Accessibility changes the usable footprint
Canadian accessible-housing guidance requires a clear floor area of at least 820 by 1390 mm directly in front of kitchen fixtures and appliances, with the same space needed to one side where drawers or doors open. For short-term residential accommodations, CSA/ASC B652:23 calls for a larger 2100 by 2100 mm clear floor area between fixtures, as set out in the CSA accessible housing guidance.
A refrigerator, range, or dishwasher therefore needs more than a correctly sized face opening. Door travel, pull-out shelves, approach direction, and mobility-aid manoeuvring space determine whether the installation is usable. Confirm local inspection expectations, rebate documentation requirements, and the exact appliance manual before finalising the layout.
Quick Reference Dimension Chart
Use this chart to reserve cabinet zones during early planning. Treat each entry as a starting point, then confirm the selected appliance's overall dimensions, rough opening, ventilation, utility connections, and door swing on its installation sheet.
| Appliance | Planning Width | Planning Depth | Planning Height | Check on installation sheet |
|---|---|---|---|---|
| Compact refrigerator | Compact category | Model-specific | Model-specific | Ventilation gap, handle projection, door swing |
| Full-size refrigerator | Full-size category | Counter-depth or standard depth | Tall-unit opening | Side clearance, hinge zone, door swing |
| Freestanding range | Common range category | Model-specific | Counter-height installation | Rear clearance, anti-tip fitting, hood requirements |
| Wide range | Wide-range category | Model-specific | Counter-height installation | Ventilation, side clearances, anti-tip fitting |
| Built-in cooktop | Nominal category width | Cutout-specific | Countertop-mounted | Cutout dimensions, underside clearance, ventilation |
| Standard dishwasher | Standard opening category | Opening-specific | Counter-height opening | Door projection, adjacent clearance, water and electrical connections |
| Compact dishwasher | Compact opening category | Opening-specific | Opening-specific | Door projection, service access, utility locations |
| Single wall oven | Model-specific | Cutout-specific | Model-specific | Cabinet ventilation, cutout, door projection |
| Countertop microwave | Model-specific | Model-specific | Model-specific | Counter clearance, ventilation, plug location |
| Built-in microwave | Cutout-specific | Cutout-specific | Cutout-specific | Trim kit, ventilation, cabinet opening |
| Washer or dryer | Model-specific | Model-specific | Model-specific | Hose and vent path, service clearance, door swing |
The chart uses planning categories rather than repeating fixed appliance figures from earlier sections. Integrated refrigerators, panel-ready dishwashers, wall ovens, and cooktops can have a visible front that differs substantially from the cabinet opening. Their finished fit depends on the installation drawing, not the product label alone.
How to use the chart responsibly
For a replacement, measure the finished opening at several points and compare it with the selected appliance's installation diagram. Record obstructions such as filler panels, trim, outlets, water lines, and baseboards. For a renovation, place each appliance in a scaled floor plan before ordering cabinetry, then draw the operating footprint with doors, racks, and handles extended.
A nominal width does not confirm a usable installation. Check the ventilation gap, handle projection, door swing, service access, panel thickness, and utility connections. Those details can affect cabinet depth, filler sizes, rebate documentation, and whether the appliance meets regional installation requirements. Verify local code and incentive rules before finalising the order, because an appliance that fits the opening may still require a different clearance or approved installation method. Keep one specification sheet for every selected model, with the product dimensions and the installation-sheet checks recorded together.
Planning Your Kitchen Layout with Dimensions
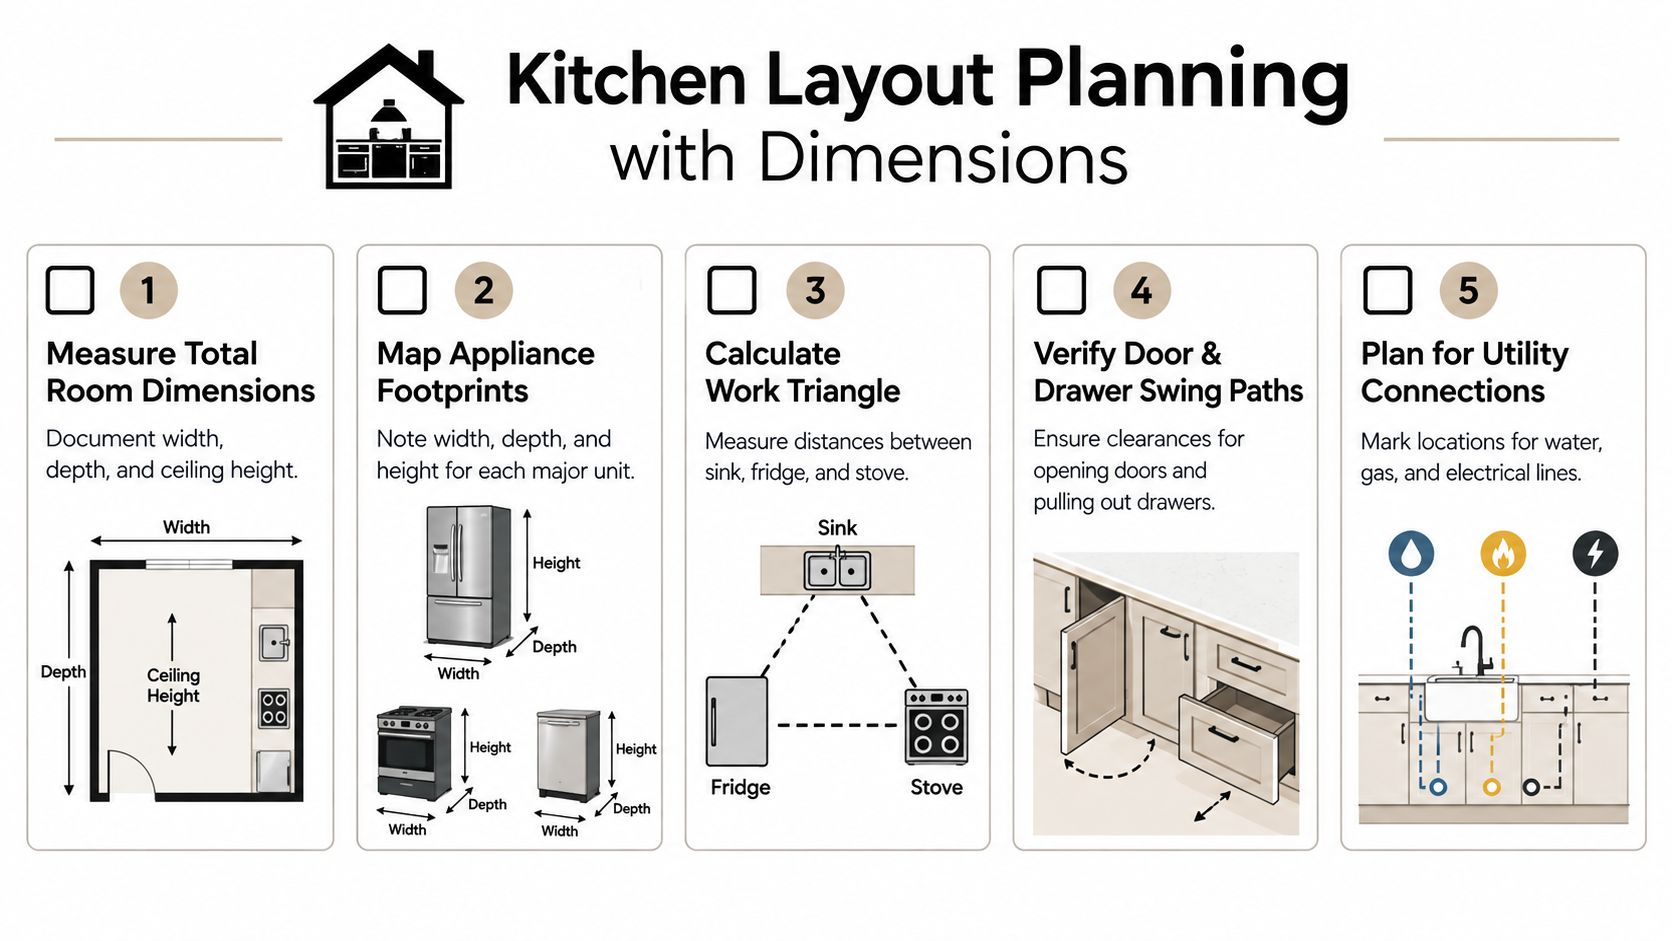
A refrigerator can fit the opening and still block the kitchen. Start with the finished room, not the appliance catalogue. Measure walls, ceiling height, windows, doors, bulkheads, existing cabinets, and every obstruction affecting a tall or deep unit. Draw the refrigerator, range, sink, dishwasher, and island to scale, then add door arcs and pull-out zones.
Build the layout around daily movement
Arrange the main appliances so food preparation, cooking, cleaning, and through-traffic do not compete for the same space. Put the refrigerator where someone can collect food without standing in the cooking zone. Keep the dishwasher close enough to the sink for practical loading, and avoid placing the range in a high-traffic corner.
Use each appliance's operating footprint, rather than its closed-box dimensions. Show the refrigerator doors open, the dishwasher door lowered, and the oven door extended. Test whether another person can pass safely, and whether adjacent drawers, handles, and cabinet doors still operate.
Apply the clearance requirements summarized earlier to the scaled plan. Check passageways, approach spaces, and swing paths for the actual appliance and the people using it. Verify the California passageway and clear floor space requirements against your local jurisdiction. Accessible Canadian layouts may call for different clear areas, so one cabinet arrangement will not suit every household or code authority.
Check incentives before you lock the model
Rebate eligibility can depend on capacity, certification, appliance type, and documentation, not only on the product category. Yukon's ENERGY STAR rebate programme requires refrigerators and freezers to have a capacity of at least 7.75 cubic feet, while Ontario legislation defines eligible household appliances within its rebate policy, according to the Yukon appliance rebate requirements.
A smaller refrigerator may solve a tight opening but fail a local capacity rule. Before paying a deposit, confirm the exact qualifying models, certification status, purchase conditions, and required paperwork. A retailer's product description does not confirm programme approval, and eligibility rules can change.
Use this final checklist:
- Measure the room and opening: Record the smallest width, depth, height, and floor condition.
- Map the complete footprint: Include handles, doors, drawers, ventilation, and service access.
- Verify circulation: Test passageways, approach spaces, and appliance swing paths.
- Confirm utilities: Locate electrical, gas, water, drain, and ventilation connections.
- Validate the incentive: Check capacity, appliance type, certification, local eligibility, and required paperwork.
A reliable plan connects the rough opening, installed clearance, code requirements, accessibility, delivery route, and rebate qualification. If one remains unknown, postpone the order and request the manufacturer's or supplier's exact installation sheet.
GrifGlo organises practical kitchen and home essentials with decision-friendly guides for comparing fit, function, and purchasing requirements. Visit GrifGlo to review kitchen buying resources before committing to an appliance that must fit both the room and the incentive rules.

Laisser un commentaire
Ce site est protégé par hCaptcha, et la Politique de confidentialité et les Conditions de service de hCaptcha s’appliquent.